Pages

Tuesday, November 19, 2013

How To Tuesday: All Natural Nourishing Face Spray


Sometimes the best things in life are the most simple. Today's post is inspired by that concept. Each year, as winter approaches my skin tends to get dry and lifeless. Now, I could run out to the store and pick up an expensive, chemical laced product and just call it a day but I prefer to see what I can make myself with pure, simple ingredients.

I actually made this spray last Thursday and I have been using it twice a day everyday as a test  before writing this post. So far I am very pleased with the results. My skin feels softer and looks brighter.  In case you are wondering I have combination skin which tends to lean more on the dry side, especially in the winter. This spray will work on all skin types but if you have particularly oily skin you might add a few drops of Witch Hazel.

What You Need:
~1 cup of filtered water
~Pure Vitamin E oil
~The petals from 2 Roses OR pure rose essential oil drops. (Make sure the type of oil you use is safe to be applied onto skin. Do not use aromatherapy oils)
~Small spray bottle.
Optional: Witch Hazel if you have oily skin.


Directions:

Bring the 1 cup of filtered water to a rolling boil and then place your rose petals into the water. Reduce heat to medium and let the petals boil for about 2-4 minutes. Then remove the pot from the heat and let it stand until cool.


Once the water is cool fill your spray bottle about 3/4 full with the rose infused water. Add  2-3 drops of Vitamin E oil to the bottle. If you want a more moisturizing spray add a few more drops of the oil.
If you have oily skin you can add a little witch hazel to create a gentle toner for your skin.

Shake the bottle vigorously and hold it about 6-8 inches from your face. After you have cleansed your face, close your eyes, and spray the rose infusion all over your face. Let the mist dry and then apply your regular moisturizer or serum.

Enjoy and I hope you all have a beautiful day!

Peace,

C


Thursday, November 14, 2013

Essential Health Foods For Just $1.


Today I wanted to share with you some of the health foods I have found and frequently purchase at my local Dollar Tree store. One reason people give for not eating healthy is that health foods are just too expensive. That can be true if you don't know where to shop. I found these items particularly helpful when I was in college and money was very tight.  

There are some health foods you can't get very thrifty with like specialty foods and organic produce. So my thinking is to save where you can so you can spend more on those specialty foods. I know there are Dollar Tree stores in the US and Canada but I'm not sure about the rest of the world.  I've been to similar stores in the UK so I encourage everyone to look for these items in their local "dollar" store. 

I chose these items based on ingredients and overall nutritional value. 

1. Flax Seed.
2. Quick Oats.
3. Tea bags. My favorite kind is by the brand Queen's Choice. 
4. Sugar In The Raw. 
5. Dry black beans. I've also seen dried kidney and pinto beans but it seems to depend on the store. 


6. Brown rice. 
7. Organic Soy Milk. 
8. Luna and Cliff Bars
9. Sea Salt
10. Seasonings. (Cinnamon, garlic, cayenne,etc. )
11. Frozen white fish. Not all Dollar Tree stores have a frozen section but the ones that do have a pretty good selection.
12. Frozen veggies and fruit. 
13. Canola spray for cooking
14. Rice cakes
15. Nuts, seeds, and dried fruit. 
16. Tuna in water. A nutritionist once told me to limit canned or pre-packaged tuna to 1-2 times per week but, if you're in a hurry or on a budget it's a much better option than the dollar menu. 


Aside from food products I have also found some personal health products which I buy on occasion. 
1. Vitamins. You should check the ingredients for each type though. I like the Vitamin E and Gingko Biloba.  
2. Antacids


3. Epsom salt for soaking sore muscles. 
4. Intimate cleansing wipes. Is that TMI, ladies? Sorry!
5. Toothpaste and toothbrushes 


Alternatively there are things I absolutely stay away from at these types of stores because of the dangerous chemicals they can contain.

~Body lotion- Holy parabens!
~Cookies, candy, chips- Sucralose. 
~Juice-100% sugar water
~Coconut water- This is a tricky one. It seems healthy but if you look at the ingredients they add a 
bunch of extra sugar. 
~FullBar- This looks like an innocent granola bar that is supposed to suppress your appetite but it's loaded with chemicals. 


As always you should look at the ingredients of each individual item because some products can vary from store to store. 

Let me know if you have visited a similar "dollar" store and what items you've found! I love being healthy and I love a deal. 


Have a fabulous day!

Peace, 

Courtney


Tuesday, November 12, 2013

How To Tuesday: Gluten-Free Chips


Good Evening! For some of you this will be more of a "How To Wednesday" since I'm posting it so late on Tuesday. Sorry about that. I've been feeling sick with a bad cold.

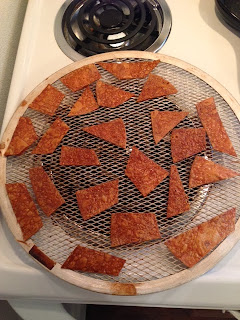
This past weekend I made a trip to Trader Joe's while I was in the DC area and I picked up one of my favorite items to make my own chips. These brown rice tortillas cost $1.99 for a pack of 6 tortillas. They are wheat and gluten free so your tummy will stay happy while you enjoy this snack.

 
You can also use this same process with any tortillas you like. I find these chips are great on their own or with hummus. Enjoy!

What You Need:

~Tortillas
~Sharp knife
~Cutting board
~Olive oil
~Sea salt or your favorite spice
~Vented pizza pan or baking sheet

Steps:

1. Preheat oven to 350 degrees.
2. Using a sharp knife lay one tortilla on the cutting board and cut into bit-sized pieces.
 

3. Next place your tortilla pieces onto the pizza pan or baking sheet. If you use a baking sheet make sure to spray it with a little cooking spray.


4. Combine a little olive oil and sea salt into a small dish. You can also add in garlic, cayenne, or any spice you like.


5. Using a pastry brush or the back of a spoon lightly spread a little of the oil and spice mixture on the tortilla pieces. If you are using the Trader Joe's brown rice tortillas you need only a very little amount. If you use too much the chips will burn.

6. Bake the chips at 350 degrees for 8-10 minutes or until they are golden brown. If you are using a baking sheet flip the chips half way through the baking time to brown both sides.

Here is the finished product:


These were so delicious I may or may not have eaten all of these in one sitting. Opps!

I hope you all are having a fabulous day and if you have any other suggestions for How To Tuesday please comment below!

Peace,

C


Tuesday, November 5, 2013

How To Tuesday: Make Your Own Kombucha


Hello lovelies.

Today I am sharing my method for making Kombucha. Kombucha is a probiotic tea made from a mushroom culture. If you've never seen a Kombucha culture it may look a bit scary, like something from a science lab, but it is completely safe. Drinking Kombucha regularly helps balance the PH in your body. This is especially important if you consume alcohol or coffee. Kombucha also aids in digestion, is high in antioxidants, and boosts energy levels. It has also been said that Kombucha prevents grey hair and helps relieve depression, but those statements have not been evaluated but any medical organization. If you have serious health concerns or are pregnant you should consult your doctor before drinking Kombucha.

I started drinking Kombucha because I was experiencing mysterious stomachaches that not even my doctor could figure out. I tried over the counter medicine and nothing worked so I decided to search for a natural remedy.  I've found drinking Kombucha has really helped regulate my digestive system. I rarely have those horrible stomach pains or cramps anymore.  I also notice a definite increase in energy and an elevated mood when I drink Kombucha.


What You Need to Get Started: 
1 Gallon glass jar or container. Never use plastic to brew Kombucha.
32 oz of filtered water
Extra filtered water to top off brew
4-7 tea bags. Organic non-flavored tea is best. I like to use black tea. It is best to only use one type of tea per SCOBY. You can always add flavors in the second fermentation.
1 cup of sugar
Dish towel or cloth
Rubberband
Kombucha SCOBY (the culture)
1 cup starter tea. Usually cultures will come packaged in this liquid. If you get a SCOBY from a friend just ask them to include some of the tea.
Vinegar for sanitizing Kombucha container


Steps for Successful Brewing: 

1. Sanitize the glass container with vinegar. Do not use soap as it will kill the Kombucha culture.

2. Bring 32 oz of water to a boil and add your tea bags. Let the tea brew for about 10 min. Remove pot from heat.


3. Stir in the 1 cup of sugar.


4. Let the tea cool slightly and then add it to your glass jar or container.


5. Gently place your SCOBY into the tea mixture along with about 1 cup of the starter tea.


6. Add cold filtered water on top, leaving about 1-2 inches of room.


7. Place the cloth over the opening of the jar and secure it with a rubber band.


8. Sit the jar in a dark, warm place in your home.

9. Check your brew everyday for signs of mold. Mold is uncommon but if your culture develops mold you have to throw the whole brew out and start over with a new culture.

10. After 7 days taste the Kombucha. If your brew is too sweet let it brew for a few more days. If it is too tart decrease your brew time in the next batch. For too tart or vinegary tasting batches you can add some fruit juice to them to even out the taste.  A good brew will be slightly carbonated and you will be able to see strands of yeast developing.


This is the basic recipe for making Kombucha. After you have brewed the Kombucha you can put it in separate glass jars or bottles for a second fermentation. Simply add fruit and let it ferment for 24-48 hours.  My favorite fruits to add are pineapple, strawberries, and blueberries. You could also add a little 100% natural fruit juice as a flavoring.

If you need a starter SCOBY let me know in the comments section as I always have extra cultures and I would be happy to send you one.

Happy Brewing!

C