Pages

Showing posts with label trader joes. Show all posts

Thursday, October 23, 2014

Roasted Pumpkin "Mac and Cheese"


Today's recipe was inspired by my desire to experiment in the kitchen and to not be wasteful of a mini pumpkin sitting in my fridge. This past Sunday my husband and I bought two small pumpkins at a farmers market with the intention of carving them out to use as chili soup bowls. We soon realized the chili would probably taste like pumpkin and we opted for regular bowls. 

To be honest I started this culinary experiment with the idea that I would make pumpkin soup and then changed my mind half way through. 

If you want to try this recipe yourself here is what you will need:

~1 small fresh pumpkin.
~Olive oil
~Water
~Blender
~1 bag of brown rice pasta
~ 1/4 cup of Raw cashews
~Mustard powder
~Chili powder
~Nutritional yeast
~Salt to taste
~Black pepper to taste
~Raw shelled pumpkin seeds to garnish.

**This dish is vegan and gluten free.
*If you have a nut allergy you can simply leave out the cashews and replace it with a little milk.


Steps for preparation:

1. Preheat oven to 350 Fahrenheit. 
2. Hollow out your pumpkin, washing the surface very thoroughly. Remove all seeds from the inside of your pumpkin. 
3.Cut your pumpkin into chunks and place them in an oven-safe dish. NOTE: You do not have to remove the skin from your pumpkin.


4. Pour about 1/4 cup of water over the pumpkin and drizzle a little olive oil over the top. 

5. Roast the pumpkin for 25-30 minutes. You will know the pumpkin in properly roasted when the chunks are soft and tender.  


This is what your pumpkin looks like after it has been roasted. 
6. Put still warm pumpkin into your blender.  
7.Also add about 1 cup of water and 1/4 cup of raw cashews into the blender. 

 8.Blend until smooth. If you need, add more water so everything gets blended well.

 9. Add blended mixture to a sauce pan with the stove temperature set on low to medium-low.
10. Add in 1/4-1/2 cup of nutritional yeast. (depending on your preference)
11. Add in 1 tsp of ground mustard powder.
12. Add in 2-3 tsp of chili powder.
13. Taste the mixture in between adding each of the spices. Add salt and pepper to your desired taste.
14. Cook and drain the brown rice pasta. Add the sauce on top of your pasta and place it in your oven (still set on 350) for 5 minutes. Add shredded cheese on top if you like before putting it in the oven.

 Viola! This is what it will look like. 
15.Sprinkle some raw pumpkin seeds over the top as a garnish. I thought of that after I took this photo. Opps!

You can leave it vegan like this or add shredded cheese on top. You could also add shredded almond cheese on top to still keep it vegan.


I thought it was really tasty so I gave a little sample to my co-worker so she can give me some constructive feedback since this was totally experimental. Let me know if you have ever tried something like this!

Thanks for stopping by!

Other places to find me:
Instagram: courtney.val
Twitter: @courtneywval
YouTube: Courtney Val or www.youtube.com\TheImperfectpearl

Sunday, July 6, 2014

Review Update: Trader Joe's Nourish Antioxidant Face Serum

Hello again!

About a month ago I did a review video on my YouTube channel and in that video I reviewed a skincare product from Trader Joe's. I also told you in that video that I would update you on how it was working after I used it for a bit more time.

In case you didn't see the video you can watch it here or below:


Now, on to the update FAQ style.

Q:Have you seen an improvement in your skin from using this product?
A: Over the past 1-2 months my skin has improved a lot but I think it is a combination of things. Since I have used this product in place of my primer I have noticed my pores are less clogged but I still get the same primer effect. I think this product has helped smooth my skin and hold in moisture from the daily moisturizer I use on top.

Q: What are the pros for the product?
A: It's gentle on your skin. It's full of great, mostly natural ingredients. It helps retain moisture and hydration in the skin. It doubles as a light primer. It is well packaged and I like the sanitary pump. It works great on bare skin or paired with a little powder for a make-up less look.

Q: What are the cons for this products?
A: It's a bit too thick in my opinion for a serum. I also wish it didn't have as much dimethicone as it does.

Q: Would you repurchase this product?
A: As of right now I don't think I will immediately repurchase this product because I want to try similar products from other brands but it is something I would use again down the road.

Q: Would you recommend this product?
A: I would but with a disclaimer that it is not like traditional syrupy serums. If you are looking for a primer with the added benefits of antioxidant ingredients then this is a good product to try.

Q: Is this product worth the cost?
A: At $10 for 1 fluid ounces I definitely think this is worth the price. I have been using it generously for 1-2 months and I really haven't made a big dent. You are also getting a lot of great ingredients for that $10. (if you'd like a full list of the ingredients just let me know and I'll type it up.)

Q: Overall impression?
A: Overall I think Trader Joe's did a great job developing this product. I think it mixes skincare with cosmetics and I like that a lot. Anytime you can accomplish two things with one product it's a plus. Also, like I said in my video I feel this is a unisex product which is unique. Good job, TJ's!


As always let me know if you have questions or comments. You can tweet me @imperfectperla, email me at cwlinguistics@gmail, or follow me on Instagram @cbwright.

Have a great day and thanks for being here!


Friday, May 9, 2014

Have you seen my latest videos? Giveaway ending tonight!

TGIF Ya'll!!

Have you seen the last few videos I have posted on my YouTube channel?  There is a giveaway happening on my April Favorites video and it closes tonight, May 9th at 11:59 PM EST. Enter to win a few neat treats!

You can head on over to My YouTube Channel-Blush&Bunnies to watch the videos or just watch below!

April 2014 Favorites+ Giveaway!


Review: Trader Joe's Nourish Antioxidant Face Serum


Hope you enjoy! Leave me any comments, questions, or requests below. Subscribe to my channel here for more health and beauty content.

Have a great weekend!

Friday, January 17, 2014

Video: Random Trader Joe's and Whole Foods Trip

Hola gal pals!

Yesterday I had to travel 2 1/2 hours away for work so I decided to take a little side trip to Trader Joe's and Whole Foods.

Before I put everything away I made a little video showing you what items I picked up. (including some of my absolute favorites!)

I actually did a more complete grocery trip last week before I knew about this work trip so I didn't need any fresh products.  I was just replenishing some everyday staples and trying out some new foods.


I hope you enjoy this video. I LOVE watching these types of videos because it gives me ideas of different items to try.  I have another trip planned for early February so please let me know if there are any other things I should try from either Trader Joe's or Whole Foods. You can comment below or tweet me @imperfectperla.


Peace,

Courtney


Friday, December 20, 2013

Video: Holiday Health Travel Essentials

Hello again, 

I hope you are having a great week. Today I wanted to share with you a little something different: a video!

Today I am traveling back to my hometown for a 10-day trip to celebrate the holidays. I couldn’t be happier to spend time with loved ones but unfortunately my family and my husband’s family have all been sick. Last year I came down with a horrible flu on Christmas Eve so this year I am packing an artillery to protect myself against those nasty cold and flu viruses. I hope you enjoy this little video and please let me know if you would like to see more videos. 


 I would love to know your recommendations for vitamins or supplements. Let me know below or tweet me @imperfectperla


Happy Holidays and Safe Travels!


Tuesday, December 3, 2013

How To Tuesday: Make Your Own Healthy, Travel-Friendly Coffee Creamer

Happy December Lovelies!

Today we're talking about one my favorite things in this whole wide world: coffee. During the colder months I like to change up my morning coffee routine and add some creamer. There is just something so comforting about a hot, creamy cup of coffee on a chilly winter morning.  Usually I like to add almond, soy, or coconut milk as my creamer but I have been traveling a lot lately and it's not easy to constantly have one of those on hand.

 So, I did some experimenting and found a way to create my own healthy travel-friendly dry coffee creamer. I know many people will be traveling for the holidays so I thought I would share this quick little "How To" in case you want to try it for your next trip.

I actually made this specific batch last week when I was traveling to a tiny town in Mississippi and I knew my options would be limited. I packed it beside the baggie of stevia packets that permanently lives in my purse.

What You Need:
~1-2 Scoops protein powder. Mine is the Vanilla Nutribiotic
~1-2 Packets of Stevia
~ 1 tbsp. Unsweetened Cocoa Powder (You can add more or less depending on what you prefer)


You just pour the ingredients into a travel size baggie and shake, shake, SHAKE! Make sure it's  closed all the way before shaking. I learned the hard way.
 
It should look something like this:


Tip: I have found the best way to mix this into coffee is to add the creamer to your cup first with a little bit of coffee. Then, with a fork mix in the creamer really well. Add the rest of your coffee to the cup and enjoy! If you are at a coffee shop you can also ask the barista to add a splash of soy milk, which will help the creamer more easily blend.
 
Essentially the protein powder and stevia are the base for your creamer but you can add in whatever flavorings your like.

 
Here are some other flavor combinations I want to try:
 
Peppermint Mocha: Chocolate protein powder, stevia, cocoa, crushed all-natural peppermint sticks.
Flavor Of Fall: Vanilla protein powder, stevia, nutmeg, and cinnamon
Chai: Vanilla protein powder, cinnamon, allspice, and clove.
White Chocolate Mocha: Protein powder, cocoa, stevia, natural white chocolate chips (I found some at Trader Joe's)
Peanut Butter Cup: Chocolate protein powder, cocoa,  stevia, and PB2
 
Let me know if you have any other flavor ideas in the comments below or tweet me @imperfectperla
 
 
Have a great day!


Tuesday, November 12, 2013

How To Tuesday: Gluten-Free Chips


Good Evening! For some of you this will be more of a "How To Wednesday" since I'm posting it so late on Tuesday. Sorry about that. I've been feeling sick with a bad cold.

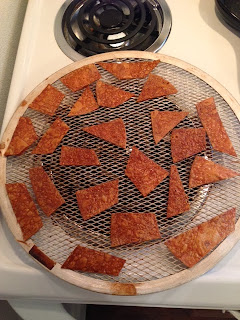
This past weekend I made a trip to Trader Joe's while I was in the DC area and I picked up one of my favorite items to make my own chips. These brown rice tortillas cost $1.99 for a pack of 6 tortillas. They are wheat and gluten free so your tummy will stay happy while you enjoy this snack.

 
You can also use this same process with any tortillas you like. I find these chips are great on their own or with hummus. Enjoy!

What You Need:

~Tortillas
~Sharp knife
~Cutting board
~Olive oil
~Sea salt or your favorite spice
~Vented pizza pan or baking sheet

Steps:

1. Preheat oven to 350 degrees.
2. Using a sharp knife lay one tortilla on the cutting board and cut into bit-sized pieces.
 

3. Next place your tortilla pieces onto the pizza pan or baking sheet. If you use a baking sheet make sure to spray it with a little cooking spray.


4. Combine a little olive oil and sea salt into a small dish. You can also add in garlic, cayenne, or any spice you like.


5. Using a pastry brush or the back of a spoon lightly spread a little of the oil and spice mixture on the tortilla pieces. If you are using the Trader Joe's brown rice tortillas you need only a very little amount. If you use too much the chips will burn.

6. Bake the chips at 350 degrees for 8-10 minutes or until they are golden brown. If you are using a baking sheet flip the chips half way through the baking time to brown both sides.

Here is the finished product:


These were so delicious I may or may not have eaten all of these in one sitting. Opps!

I hope you all are having a fabulous day and if you have any other suggestions for How To Tuesday please comment below!

Peace,

C


Tuesday, October 22, 2013

How to Tuesday: Bad to Better

Hello lovelies!

Today I wanted to share with you a little baking "How To" since my last two Tuesday posts were beauty related.

Recently I was cleaning out my cabinets and I found a random blueberry muffin mix. It wasn't an extremely unhealthy mix but it wasn't exactly nutrient rich either.  I thought about donating it to a local women's shelter but when donating food I have one strict rule of thumb: never donate something you wouldn't want to eat.

Instead of tossing it completely I decided to take the mix and see what I could do to make it a little more nutritious.

 To bring down the glycemic index and add extra protein I added one scoop of NutriBiotic Vanilla Brown Rice Protein powder to the muffin mix.


In place of the milk the recipe called for I added half organic plain yogurt and half water. I find that adding yogurt helped balance the protein powder, which can sometimes dry out your batter or leave a chalky taste. Luckily I have never really noticed a chalky after taste with the NutriBiotic protein powders. The yogurt also added protein and calcium to the muffins.

For another boost of nutrients I added about 2 tbsp. of sesame seeds to the mix. Sesame seeds are a great source of copper, zinc, magnesium, calcium, and iron.You could also add chia seeds, chopped almonds, or walnuts.

I then mixed it all together with a wire whisk. I find using a whisk is the easiest way to mix protein powder into batter.


I decided to make mini muffins for a little built-in portion control.
 Using a measuring spoon I scooped in 1 Tbsp. of batter to each mini muffin mold.


I then followed the baking instructions on the packet, checking the muffins every 5 minutes.
Ta da! Bad to better.


 I did end up taking some of the muffins into a women's shelter and they went over great!


Try this yourself with that muffin or cake mix you have sitting in the back of your cabinet. I would love to know what you added or changed to make the mix more healthy. Let me know in the comments below!

Also, check out this website I found that has nutritional information for all your favorite healthy foods. I literally just spent an hour browsing this site. Love it!
http://www.whfoods.com

Peace, love, and baking!

C