Pages

Thursday, September 17, 2015

REVIEW: Maybelline Better Skin Foundation


I am back today with another review and this time we're talking foundation and skincare. Maybelline has developed a new foundation that is supposed to actually improve the condition of your skin in 3 weeks of use. I was able to try this product through Influenster but as you will see, my opinions are not biased by the fact that I didn't purchase this product myself.

  • If you are interested in trying Influenster for yourself you can sign up HERE

On with the review!

When I took the Influenster "snap", which is a little survey to determine whether or not you are eligible for a certain product, I remember choosing the second to lightest shade for this foundation. That being said, I received the shade 10 Porcelain.


This shade is too light for my skin tone so really I could never get a true idea if this foundation would work for me. I had to mix it with a darker foundation to make it match my normal skin tone. The darker foundation I used was the Maybelline Fit Me foundation in the shade 120. I needed to use this foundation up anyway so I thought this was a good opportunity to do that. I also thought that maybe since they were both Maybelline foundations it might help me decide if, under normal circumstances, I would like this foundation. 

After 3 complete weeks of use I have some distinct pros and cons for this product.

Pros:
1. The formula definitely didn't irritate my skin and my skin stayed clear of blemishes while using this foundation. 
2. The formula feels very light on your skin. 
3.The packaging is nice and I love that it comes with a pump.


Cons:
1. It make my skin look dry.
2. The color match was completely off.
3. The coverage is light and it did not cover any of my dark spots. In fact, I think it made them look worse.
4. On the days I didn't mix it with another foundation my skin had a weird grey tint to it.
5. It contains no SPF so it provides no protection from the sun.

As you can probably guess this foundation did not work out for me. I think if you already have nice skin and don't need to cover anything up this foundation would look beautiful on you. Also, if you are in your early teens and looking for a light coverage foundation to keep your skin clear this would be a nice starter foundation.

 I really think Influenster should have offered all shades to chose from and included the shade names in the survey before offering to send out samples. From talking to other people who were in the test group, many of us received the wrong shade for our skin tone so we can't really give a truly accurate review of how this product works.

I do think this product has properties in it to keep your skin clear of blemishes which is great. I sometimes suffer from acne and I think this foundation helped prevent those breakouts.

In the end there were two clear things that made up my mind about this foundation: the color and the coverage. I think if I was given my correct shade my opinion would be much better. I tried to imagine how I might look if this were the correct color but it sure is hard when you are staring at a dull ghost in the mirror. I also think if this foundation provided more coverage I would have been able to work with it a bit better.

Those are just my thoughts and I would love to hear your thoughts on this product if you have tried it. Let me know in the comments or hit me up on any of my social media sites linked below.

Thanks for stopping by my blog and have a great day!

Courtney

Other places to find me:
Youtube Channel: https://www.youtube.com/channel/UCbpfO5F6gkN8wjSsCrzOnDg
Instagram: https://instagram.com/courtney.val/
Twitter: https://twitter.com/courtneywval
Pinterest: https://www.pinterest.com/courtneywval/
Email: courtneywval@gmail.com
Facebook: https://www.facebook.com/CourtneyValYT


Thursday, September 10, 2015

REVIEW: OZ Naturals New Age Defying Tinted Sunscreen

Good Morning!

Today I have a review from an all natural skincare brand that is quickly becoming one of my favorite brands.
I'm talking about OZ Naturals and the product I'm featuring today is their brand new Age-Defying Tinted Sunscreen.


This sunscreen provides broad spectrum SPF 30 sun protection. I find that the formula absorbs into your skin very quickly and is not at all sticky. It doesn't feel like a normal sunscreen. It feel smooth and more like a BB cream. This product comes in a 2 fl oz tube so it's great for travel or for throwing in your bag. Currently this product is available on Amazon at http://amzn.to/1UE744f. 


The tint of this sunscreen is a medium to bronze skin tone color. I have very light skin so I couldn't use this on my face. I did, however, find that it looks great on my body to add a little color with sun protection. On the days I applied this on my neck, chest, and arms I also applied a matte bronzer to my face to make everything match. (Side Note: My current favorite matte bronzer is the Body Shop Honey bronzer in shade 3)


It does provide really nice sun protection. I have used some sunscreens in the past that had super high SPF (50-100) and somehow I still ended up with a sunburn or more freckles. On the days I used this sunscreen I definitely didn't get burnt and I didn't notice any new freckles. I did reapply every 80 minutes but you are supposed to do that with any sunscreen. If you are slightly self-conscious about your feckless like me, the tint of this cream helps blend in those little dots to make your overall skin tone look more even. Since the tint washes off in the shower you can get a subtle bronzed look to your arms and legs without the commitment (and potential disaster) of a sunless tan. 


I have also used this sunscreen during my outdoor runs and I found it stayed in place really well. These runs are the only time I used it on my face because I don't really care what I look like while I'm getting in those miles. Even when my hairline started to sweat the sunscreen still stayed in place and it never ran into my eyes. My husband is a dedicated and extremely sweaty soccer player so I had him try it on his face. The sunscreen stayed in place even with his torrential sweat. 

P.S. My husband has a medium skin tone so this would actually be a great product for men who are looking to even out their skin tone while protecting their skin from the sun. It didn't look like he was wearing makeup either. His skin just looked like it had a healthy glow. This is definitely a unisex product in my opinion. 

Overall, I am very pleased with this tinted sunscreen. I most prefer to use it on my legs for days I am wearing a dress or skirt. It also works great on your upper body too. If you have a medium skin tone, this would make a great BB cream. 

Product Recap:

Have you tried this or other OZ products? Check out the OZ Naturals website at http://www.oznaturals.com/  and don't forget to sign-up for their newsletter to stay up to date with their newest products. 

Other places to find me:
Youtube Channel: https://www.youtube.com/channel/UCbpfO5F6gkN8wjSsCrzOnDg
Instagram: https://instagram.com/courtney.val/
Twitter: https://twitter.com/courtneywval
Pinterest: https://www.pinterest.com/courtneywval/
Email: courtneywval@gmail.com
Facebook: https://www.facebook.com/CourtneyValYT

*This post is brought to you by Brand Backer. As always all of my opinions and experiences are 100% honest. 


Thursday, July 23, 2015

GIVEAWAY: Kiss Me Organics Dandelion Tea


Happy Friday Eve!

I am hosting a small giveaway on my Facebook Page! I was sent some of this Kiss Me Organics tea to try and I love it so much I want to pay it forward and gift TWO of you with a box of your very own to try.

This tea contains organic dandelion root which promotes liver detox, cinnamon to regulate blood sugar levels, and hibiscus which supports a healthy complexion. I love this combination. After I drink this tea I definitely notice that my skin is brighter and I have more natural energy. This is perfect to hold or cold but I prefer to drink it after dinner.

To enter:
1. Go on over to my Facebook Page and give it a "Like."
2. Leave a comment on my giveaway post telling me what your favorite tea is.
3. That's it! The giveaway will run until 7/30/15 at 11:59pm EST and a winner will be chosen using a random picker. You must be 18 or have the permission of your legal guardian to give out your address. This giveaway is international but please know that I may not be able to get a tracking number for international packages.

4. Good luck and thank you so much for entering! :)


Other places to find me:
Youtube Channel: https://www.youtube.com/channel/UCbpfO5F6gkN8wjSsCrzOnDg
Instagram: https://instagram.com/courtney.val/
Twitter: https://twitter.com/courtneywval
Pinterest: https://www.pinterest.com/courtneywval/
Email: courtneywval@gmail.com
Facebook: https://www.facebook.com/CourtneyValYT


Wednesday, June 24, 2015

Blossom VoxBox Review

Hey lovelies!


I am super late on blogging about the VoxBox Blossom box, I know. I do want to share my thoughts though so I hope this post is helpful.

I also filmed an un-boxing and taste test video which you can watch here:


The products I liked the most were the food items. The Beanitos chips were amazing and I would definitley purchase those with my own money. The same goes for the Bare Naked Granola and the Nasoya Pasta Zero noodles. I have actually already purchased the Nasoya noodles before and I will continue to repurchase them. They make an excellent healthy ramen soup.


The beauty product portion of the box is where I am a little unimpressed.
 The Australian Gold sunscreen is good and it's a very useful size for traveling. I think the Sally Hansen's Air Brushed legs might work for someone with a different skin tone. The formula seems nice but the shade I received makes me look like a Oompa Loompa. Yikes!


The Clariol shampoo is also nice but contains sodium lauryl sulfate which can strip color from your hair and I have color treated hair so I try to stick with shampoos without that ingredient. My husband can use it and it smells very nice so it's not a complete flop either. The NYC eyeshadow stick is not my favorite. It seems pigmented at first but when you start blending, the pigmentation dissolves and it's just a bunch of glittery specks. It also does not hold up in the heat without melting and creasing.


I don't want to say I completely hated the beauty products in this box. I just think these products were  not right for me. They might be awesome for someone else. Am I alone here? Let me know your thoughts on these products if you have tried them.

Thanks for stopping by and check out the links below to stay connected! :)

Other places to find me:
Youtube Channel: https://www.youtube.com/channel/UCbpfO5F6gkN8wjSsCrzOnDg
Instagram: https://instagram.com/courtney.val/
Twitter: https://twitter.com/courtneywval
Pinterest: https://www.pinterest.com/courtneywval/
Email: courtneywval@gmail.com
Facebook: https://www.facebook.com/CourtneyValYT


Tuesday, June 23, 2015

REVIEW: Clean Bar Box Subscription

Good morning!

I just posted a new video on my YouTube Channel reviewing a new soap subscription service called Clean Bar Box. This service is similar to the popular beauty subscription services out there in which you pay a small monthly fee and each month they send you new products. In this case all of the products are handmade bars of soap.

There are 3 options for this subscription service:

Monthly Half Bar Sampler Box- $14.99
~This comes with four 2.5oz bars of soap

Monthly Large Box-$19.99
~Comes with two 5 oz bars and two 2.5oz bars

Every Other Month Large Box-$19.99
~Get all the goodies from the monthly large box shipped to you every other month.


I was sent the Monthly Half Bar Sampler Box to try and I love these soaps. From first touch you can feel how moisturizing they are. My box included an exfoliating Blueberry soap that has ground up oatmeal right in the bar for a gentle exfoliation. All of the soaps smelling amazing too.  These scents are neither too feminine nor too masculine so I think this is definitely a unisex product. I even had my husband try them and he loved them too. They cleanse your skin really well and leave you feeling very fresh.

Aesthetically, the packaging of these soaps is very natural looking and it appears that the box and shredded paper in the box can be recycled. Each soap comes in a small burlap pouch that you could reuse. (jewelry, hair ties, small office supplies, bobby pins, etc)

I think this is a really nice subscription service for anyone who loves bath and body products. This would make a really nice gift too.

Watch my review video here:


Thanks for stopping by and I check out the links below to stay connected! :)

Youtube: https://www.youtube.com/channel/UCbpfO5F6gkN8wjSsCrzOnDg
Instagram: https://instagram.com/courtney.val/
Twitter: https://twitter.com/courtneywval
Pinterest: https://www.pinterest.com/courtneywval/
Email: courtneywval@gmail.com
Facebook: https://www.facebook.com/CourtneyValYT

Tuesday, June 9, 2015

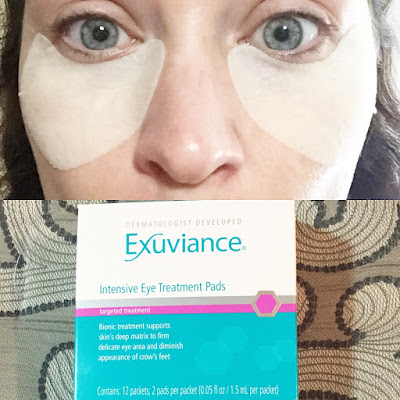
SPA REVIEW: Exuviance Intensive Eye Treatment Pads


Hello again!

I hope you all are having a good week so far. I want to share a spa skincare review with you today for the Exuviance Intensive Eye Treatment Pads.


The Details:
Size: 12 treatments with 1.5 ml of product in each packet (Each packet contains 2 pads)
Cost: $48
Where to buy: http://www.neostrata.com/product/exuviance+eye+treatment+pads.do

How To Use:
These are individually wrapped treatment pads you place under your eyes after you have cleansed your skin. After you have smoothed the pad carefully under your eye, you lay back and let the product work it's magic for 10-30 minutes. This process can be repeated up to 3 times per week. After you remove the pad you can gently pat in any excess solution. Then you can apply your eye cream and other skincare routine products as normal.


My Experience and Thoughts:

I posted the photo above on my Instagram account, @courtney.val right after I applied the pads. I decided to let them sit on for the full 30 minutes while I had my morning coffee. The pads felt very soothing and I could feel a light firming sensation. It wasn't a tight uncomfortable feeling at all. It felt like my under-eye bags were being pulled back into my body. I bet that sounds really weird but it felt amazing! Have you ever seen that scene from the movie Death Becomes Her where she ages in reverse right before our eyes? It felt like that was happening under my eyes. That combined with the soothing feeling made me feel like I was in a real spa.

After I removed the pads I very lightly massaged the rest of the solution into my under-eye area and then applied my normal skincare routine. My whole eye area felt refreshed and instantly looked more youthful. I also noticed that it brightened my under-eye area and the little lines under and around my eyes were drastically reduced. I am really pleased with these treatment pads and definitely recommend them.

These eye treatment pads definitely give you a luxury spa treatment at home. I think they are worth the price point as you get 12 treatments for $48 which is just $4 per 30 minute treatment. Depending on how often you do a treatment this product could get you 12 weeks worth of anti-aging treatments. The directions suggest 2-3 treatments per week but since I am still relatively young I would probably use 1 per week.


Usage Ideas:

Here are some occasions where I think these would be perfect:

  • Brides/bridesmaids preparing for the big day.
  • Host a spa night with your friends.
  • Use on a long flight to relax and rejuvenate.
  • Take with you on vacation for an extra relaxing experience.
  • Give as a gift to someone you know loves skincare and spa treatments.
  • Use as preventative or restorative anti-aging skincare.
Have you tried these treatment pads? Let me know in the comments section how they worked for you. Or, let me know if you have tried any of the other Exuviance products as I am very interested in trying more from this line.


Check out my review video here:


I hope you enjoyed my review and it was helpful for you. Thanks for stopping by and have a great day!


Other places to find me:
Youtube: https://www.youtube.com/channel/UCbpfO5F6gkN8wjSsCrzOnDg
Instagram: https://instagram.com/courtney.val/
Twitter: https://twitter.com/courtneywval
Pinterest: https://www.pinterest.com/courtneywval/
Email: courtneywval@gmail.com
Facebook: https://www.facebook.com/CourtneyValYT

*I received this product through Brand Backer for my honest review. All opinions and experiences are my own. I never write positive reviews just because I receive a product for free.


Thursday, June 4, 2015

Journey Into Running Update

Why hello there.

It has been a little while since I updated you on how my journey to become a runner is going so I want to share my progress with you now.

In just 20 short days I will hop on a plane to Denver for the Slacker Half Marathon


The actual race is not until June 26th, but I am flying in 2 days early so I have time to adjust to the altitude. I currently live at 10ft above see level and the race is taking place at 10,000 ft above sea level so I already expect it to be more challenging. Knowing this, I am trying to train extra hard so I can finish the race in a reasonable amount of time. I chose this race specifically because my best friend Annie lives in Denver so we thought it would be fun to do this together.

 Everything is better when you do it with a friend!

Training Progress

In my last running post I shared 5 easy ways to become a runner and I have stuck by my advice. Each week I make sure I get in a few strength training workouts, change up my playlist, set new goals,walk if  I need to, and confront any emotional barriers. All of these small things combined make each run easier than the previous one. I literally take it one step or one mile at a time.

At the beginning of my journey I used a specific 1/2 marathon training schedule but I quickly realized it did not fit with my work/life schedule so I made up my own. If you are brand new to running then I would definitely recommend using a schedule to get you going. I was already pretty comfortable running a 5k when I started this journey so I used 3.1 miles as a starting place and just gradually added miles from there. That being said, you MUST be careful how you add on miles. If you add miles too fast you could risk injuring yourself and then your whole plan could be ruined.

That almost happened to me. One day I was on a 4 mile run and after I completed the 4th mile I still felt good so I decided to keep going. I stopped after 6 miles and at the time I felt very accomplished.  The next morning my ankle hurt so bad I could barely put much pressure on it. I almost freaked out thinking I had suffered a stress fracture and my whole 1/2 marathon would be ruined. I called up the nurse at my doctor's office and she suggested I use heat and ice on it before coming in for an evaluation.  I followed her directions and also used a supportive ankle brace consistently for a few days. Luckily the pain went away quickly but I took this pain as a clear sign from my body that I needed to slow down. I reset myself back to 4 miles and then only added on .5 a mile each week.

I am now up to 9.5 miles. If I stay on track with this rate I will complete 12.5 miles before the race and be ready to knock out that last .6 mile on race day. I am not worrying too much about how fast I am since this is my first 1/2 marathon. Instead I am just focusing on feeling good about running in general. I want to fall in love with running and all the benefits that come from being a runner. I do have an overall time goal for myself which is to average a 10 minute or less mile. I have completed this goal on some runs but other times I would have to walk more so my mile would be higher. It's OK, though.

Revelations and Advice

Shoes-About 5 years ago I bought a pair of Asics based on having my feet measured and evaluated. I always felt they were a little bulky but they felt great on my feet and I had a nice amount of support. I decided to get a new pair and this time opted to just get some on my own without the measuring process. I chose these shoes by Adias. They are lighter weight than my Asics but still offer a lot of support where I need it.


I am not surprised I love these shoes because they are very similar to a pair I had way back in high school. Choosing this lighter model of shoe has made a huge difference. I no longer feel weighed down by my shoes. I was also due for a new pair of running shoes because every pair of shoes has a mile limit on them. My doctor said on average a pair of running shoes will be good for 400-600 miles but each person is different. Check with your doctor about when you should replace your shoes. 

Bra- Of course if you are a man reading this, it will not apply to you. Ladies, if your back, neck, or actual breasts hurt after working out, you may need to update or upgrade your bra. One reason I didn't like running before is because my chest hurt and it was just uncomfortable. I then found the right bra and it helped immensely. I like the type bra that has cups and clasps in the back. I think it combines the best parts of a regular bra with a sports bra. 

Staying motivated- It is very easy to lose motivation if you have a bad run. A good way to motivate yourself to get out there again is to go back to your "mini-goals" that we talked about in my last post. Or try running with a buddy and you both motivate each other to keep going. You can also join a fitness community to help you stay accountable. I am a member of the Tone It Up fitness group and I love that group because I know there is always someone there who will motivate me and give me support when I need it. Tone It Up girls are the best!

General Advice-The best piece of advice or encouragement I can give to anyone who wants to become a runner is to just start slow. I know it sounds corny but getting started is the hardest part. Even if you are moving slow, just keep moving. Five months ago I hated the very thought of running and now I run 9 miles in one go. What?! It really is possible to become a runner if you set your mind to it. 

You can do it! 


I hope you enjoyed this post for today and you can follow my other social media sites below. Leave me any comments or questions down below. :)

Have a great day!


Other places to find me:
Youtube: https://www.youtube.com/channel/UCbpfO5F6gkN8wjSsCrzOnDg
Instagram: https://instagram.com/courtney.val/
Twitter: https://twitter.com/courtneywval
Pinterest: https://www.pinterest.com/courtneywval/
Email: courtneywval@gmail.com
Facebook: https://www.facebook.com/CourtneyValYT


Tuesday, June 2, 2015

High End Skincare Review: Solvaderm ACE – FERULIC Skin Damage Restoration & Photo Aging Defense Serum

Hello friends!

As summer comes our way we all are trying to figure out how we can best save our precious skin from the sun and other environmental elements. Sun damage and free radicals in the air can age your skin faster, causing unwanted wrinkles, spots, and a dull complexion. Um, no thanks!


Along with a high SPF, I am adding another product to my beauty regime to help correct some existing skin damage and prevent further damage. I have been using the Solvaderm ACE-FERULIC serum. This serum is designed to help protect your skin from UV damage, photo aging, lighten hyper-pigmentation, and fight free radicals. It is also packed with vitamins to nourish your skin. It also works deep within the layers of your skin to increase protein and collagen production, resulting in more plump, younger looking skin. I think this product would be best suited for those age 25+ but both men and women could benefit from this product.


The Facts:
Size: 1fl oz (30 ml)
Cost: $109 (Free shipping for any order over $50)
Where to buy: https://www.solvaderm.com/ace-ferulic.html
Beneficial Ingredients: Ferulic Acid, Vitamin C, Vitamin E, Vitamin B3, Vitamin B5, Hyaluronic Acid

How I use this product:
I apply this serum in the morning and at night after cleansing and toning my skin. This product is extremely liquidy so you have to work quick. I get a tiny bit on my finger tips and apply it starting at the top of my head and working my way down to my neck. The serum absorbs super quick which I love. I then apply my eye cream and wait about 5 minutes to apply my face moisturizer.  In the morning I use a high SPF moisturizer for further skin protection. At night I apply my nighttime moisturizer without SPF.


My Results and Experience:

Initially I noticed that my skin was more plump and the breakouts around my chin area disappeared almost overnight. The blackheads on my nose also disappeared. I have little fine lines on my forehead I am kind of self conscious about and after 2-3 days my forehead was already much improved.  Now, my skin looks more plump and has what I like to call "The 20 year old glow".  The dark spots on my forehead are lighter too and instead of being an intense brown color they are more yellow-toned. I am hopeful that with consistent use they will get even lighter. Honestly, my skin is in the best condition of my life.  About a year ago when I started to notice those little fine lines and dull skin I thought it would all be down hill from there. Now I know it doesn't have to be that way and I can repair previous damage and give my skin the best chance possible.

I really like how potent yet gentle the formula is. I never experienced any irritation or negative reaction. I do have dry/sensitive skin so I sometimes experience redness or slight irritation from normal skin care products.

I definitely recognize that this is a high end product and is for those who are really serious about anti-aging skincare. If you are looking to maximize its use you might concentrate just on the areas where you need the most help with your skin. Or, if you are considering spending hundreds or thousands on medical cosmetic treatments for plumper, more youthful skin, you might consider this serum first to see if it gives you the results you desire.

Those are my honest thoughts on this product and I hope it was helpful for you. If you have any other questions or comments let me know below or on any of my social media sites. Also let me know if you would like me to give you an update in the future about how this serum is treating my skin after prolonged use. I would be happy to continue sharing my skincare journey with you.

Have a great day and thanks for stopping by my blog!


Other places to find me:
Youtube: https://www.youtube.com/channel/UCbpfO5F6gkN8wjSsCrzOnDg
Instagram: https://instagram.com/courtney.val/
Twitter: https://twitter.com/courtneywval
Pinterest: https://www.pinterest.com/courtneywval/
Email: courtneywval@gmail.com
Facebook: https://www.facebook.com/CourtneyValYT


*Powered by BrandBacker. All opinions and experiences are my own and 100% honest. 

Wednesday, May 20, 2015

REVIEW: Maxasorb Melatonin Cream For A Good Night's Sleep!


Good Morning, lovelies! How did you sleep?


Recently I have been having trouble falling asleep and staying asleep. Then I saw an opportunity to apply to review the Vita Sciences Maxasorb Melatonin Cream through Brand Backer. I applied and thankfully was chosen to receive the product for free to try.

Of course, just because I receive something for free to try doesn't mean I am paid to say positive things about the product. I always give my 100% honest review of whatever product I review. I try to give best information possible so you can decide if a product is right for you.

On to the review!


How I use this product:
The directions say to rub one pump of the cream on your arms and legs before bedtime. One pump equals 3mg of Melatonin. I use this product in combination with my normal bedtime relaxation routine. I like to take a shower or bath and then apply the cream. I then make a cup of sleepy time tea while I finish up any little tasks before actually getting into bed. Now, I know if you have children to care for you might not have time to sip tea or take a bath. So you could apply the cream quickly and let is sink in while you get your children ready for bed. Then, by the time they are asleep you will be feeling relax and ready for bed yourself.

Does It Work?
I would say it definitely relaxes you and allows you to fall asleep fast. It is very relaxing. I mean floating on a cloud in a tranquil garden type of relaxed. It will seriously relax you. I think it did also help me stay asleep and wake up rested. I used it on my husband a couple nights too because he was having trouble sleeping and his bouncing around was keeping me awake. He said it did make him feel very relaxed too. My husband has this weird sleeping leg twitch thing that I am not even sure he really knows he does but the nights I applied the cream on him, he wasn't twitching as much which helped me sleep. Yay!

I have tried other Melatonin pills in the past and they all gave me crazy weird dreams but I didn't notice that with this product.

Overall, I would definitely recommend this to anyone who is having a hard time falling asleep or staying asleep. 

Other Potential Uses:
Based on my experience I can think of some travel-related situations in which I will use this cream.
  • Overnight flights
    • This would have been great for our 9 hour flight to Brazil last year.
  • Hotel stays
    • I don't know about you but I sometimes have trouble sleeping well in hotels. I think this product would help make any relaxing vacation even more restful.
  • Jet lag
    • After you return from a trip to another time zone it can be hard to get your sleep schedule regulated so I think this might help. 


Product Details:
Size:50ml 
Contains 60 doses. Each dose is 3mg of Melatonin
Price: $19.95
Product Link: http://www.vitasciences.com/MaxasorbMelatonin


Let me know if you have tried this or other sleep aid products and how they worked for you.

Thank you so much for stopping by my blog!


Other places to find me:
Youtube: https://www.youtube.com/channel/UCbpfO5F6gkN8wjSsCrzOnDg
Instagram: https://instagram.com/courtney.val/
Twitter: https://twitter.com/courtneywval
Pinterest: https://www.pinterest.com/courtneywval/
Email: courtneywval@gmail.com
Facebook: https://www.facebook.com/CourtneyValYT

*Powered by Brand Backer


Saturday, May 9, 2015

REVIEW: OZ Naturals Hyaluronic Acid Face Serum


Good Morning!

I am back with another skincare review today from OZ Naturals, an all natural cruelty-free company.
For the past two weeks I have been trying their Hyaluronic Acid serum. I have mentioned before in reviews and on my YouTube channel how much I love Hyaluronic Acid vitamins so I was excited to try the serum form. This serum comes with a dropper and the actual consistency is like a gel. One dropper full is enough to cover your whole face.


The Details:
Cost:~ $16.45
Size: 1oz (30ml)
Where to buy: http://www.amazon.com/OZ-Naturals-Hyaluronic-Satisfaction-GUARANTEED/dp/B00C7DYBX0/ref=sr_1_3?ie=UTF8&qid=1428716684&sr=8-3&keywords=oz+naturals

How I use this product:
After cleansing and toning my face I smooth one dropper full all over my face and neck. I let it sink in before applying my moisturizer. I prefer to use this in the morning but it can be used morning and night. I also really like to add a little of this serum to my full coverage foundation for a healthy, dewy makeup look.

Recently I have been sick with a bad cold so some days I would go without makeup and just apply this serum and my moisturizer. I think this product is really nice for make-up free days and has helped my skin not look so drab even while being sick. The formula is also powerful but gentle on your skin.


Results:
I have noticed that this serum boosts my overall skin hydration.I think it has helped smooth my overall skin texture too. I have some very fine lines on my forehead and I notice this serum helps smooth them and make them less noticeable under my makeup.

Final Thoughts:
I think this Hyaluronic Acid serum is very nice and I would recommend it to anyone who wants more hydrated, radiant skin. I also think if you are just starting to experiment with high quality skincare products this would be a good product to start with. It won't irritate your skin and will give you a nice youthful glow. Overall I really love the OZ Naturals brand including this serum. I love that this company creates all natural and cruelty-free products.

Have you tried any OZ Naturals products? Let me know in the comments sections or on any of my social media pages. I would love to hear your experience.

Thanks for being here and have a great day!


Other places to find me:
Youtube: https://www.youtube.com/channel/UCbpfO5F6gkN8wjSsCrzOnDg
Instagram: https://instagram.com/courtney.val/
Twitter: https://twitter.com/courtneywval
Pinterest: https://www.pinterest.com/courtneywval/
Email: courtneywval@gmail.com
Facebook: https://www.facebook.com/CourtneyValYT


*Powered by Brand Backer. All opinions and experiences are my own. 


Monday, May 4, 2015

REVIEW: Radha Beauty Skin Clearing Serum


Good Morning, lovelies!


I am really excited to share this skincare review with you today. Over the past 6-8 months I have been dealing with some serious skin issues. I thought I had cleared up my sporadic acne issues and then one day I started getting a lot of blemishes around my chin, on my cheeks, and on my forehead. I thought at first it was hormonal or due to a migraine medication I was taking but the blemishes continued to appear even after I stopped the medication. I discussed these skin issues with my doctor and she could not think of anything in particular that might be causing my constant breakouts.
I also tried changing my diet and taking vitamins. Nothing seemed to work.

I recently joined Brand Backer, which is a platform for bloggers/vloggers. This site allows bloggers to view products and apply to try them. I was reading through the description for the Radha Beauty Skin Clearing Serum and I thought, "Yes, that is what I need. " I applied and gratefully was accepted. I have been using this product twice a day for two weeks and my skin has improved 100%. The formula is a liquidy consistency but a little goes a long way. You really get a high level of quality for your dollar with this product. I would say it is comparable to extremely high end skincare products. The scent is herbal and fresh. I do find that the scent goes away once the product full absorbs into your skin.

 After two weeks of use all of the deep blemishes I was experiencing are gone and I started noticing an improvement in my skin after just a few days. My skin looks brighter, clearer, and more even. I also notice that my freckles and dark spots are starting to fade. I think this was what my skincare routine was missing. I think this product could be used to help with many types of skin issues and for a wide range of skin types and ages. If you have any doubts you can always consult your doctor.  I definitely recommend this product and I will be repurchasing it for sure.


The Details:
Size: 1oz (30ml)
Cost:$19.89 Shipping if free with Amazon Prime or $3.99+ depending on the shipping option you chose.
Active Ingredients: 
20% Vitamin C
2.5 % Retinol
5% hyaluronic Acid
2 % Salicylic Acid
3.5 % Niacinamide

Importation Information:

  • You should always wear a sunscreen but especially when using this product as it contains Retinol, which can make your skin more sensitive to the sun. 
  • This product is made with all natural ingredients and is cruelty free!
  • Use 1 pump after cleansing and toning your skin. This product is very potent so a little goes a long way.
  • Allow product to skin into your skin for 5 minutes before continuing with your other skincare routine steps. 
Bottom Line:
Would I recommend this product? YES!

You can try this product yourself by clicking HERE

I also did a video review of this product on my YouTube channel which you can check out HERE


Other places to find me:
Instagram: https://instagram.com/courtney.val/
Twitter: https://twitter.com/courtneywval
Pinterest: https://www.pinterest.com/courtneywval/
Email: courtneywval@gmail.com


FTC Disclaimer: I was sent this product for review purposes through BrandBacker. All opinons are 100% honest and my own. 


Monday, April 6, 2015

Brown Rice & Flax Bread Recipe

Good Morning!

I hope your week is starting off well. I have a new recipe to share. Last night during my Sunday prep I decided to make my own version of the popular Ezekiel bread.


First, I don't have an actual bread pan so I had to use this dish. I would recommend you use an actual bread loaf baking pan for best results. Ideally an 8 x 4 inch pan works best.  I'm going to buy one soon so I can make this again properly.


Ingredients:

Small batch 6-8 slices
1 1/2 cup of brown rice flour
1/3 cup of flax meal
3/4 tsp of baking powder
1/4 tsp baking soda
1/4 tsp salt
1 cup of cashew milk (almond or dairy could be used)
2 eggs

Large batch 8-12 slices
3 cups of brown rice flour
3/4 cup of flax meal
1 1/2 tsp of baking powder
3/4 tsp baking soda
3/4 tsp salt
2 cups of cashew milk (almond or dairy could be used)
3 eggs

Optional ingredients:
1-2 Tbsp of agave nectar for a sweeter bread
1-2 Tbsp whole flax or chia seeds.


Instructions:
1. Preheat oven to 350
2. In a large bowl whisk together all dry ingredients so they are mixed thoroughly.
3, In a separate bowl whisk together the wet ingredients.
4. Mix wet and dry ingredients together with large kitchen spoon.
5. Oil your bread pan.
6. Bake for 60 minutes.
*Optional: Sprinkle flax seeds on top before baking.
7. Let the bread cool for 20 minutes and then slice.
8. Store bread in a zip lock bag in the fridge for up to a week.

Let me know if you make this and how it turns out. Have a great week!


Places to connect:
YouTubehttps://www.youtube.com/user/TheImperfectpearl
Instagram: https://instagram.com/courtney.val/
Twitter: https://twitter.com/courtneywval
Blog: http://www.imperfectpearl.blogspot.com
Pinterest: https://www.pinterest.com/courtneywval/
Email: courtneywval@gmail.com


Wednesday, April 1, 2015

Photo A Day: February & March 2015

Opps! I forgot to post my February photos so I am posting them now along with my March photos. I tried something new this month and did a collage. I am not sure if I like it so maybe next month I'll go back to single photo per day style.

Enjoy!

February 2015


March 2015


Places to connect:
YouTube: https://www.youtube.com/user/TheImperfectpearl
Instagram: https://instagram.com/courtney.val/
Twitter: https://twitter.com/courtneywval
Blog: http://www.imperfectpearl.blogspot.com
Pinterest: https://www.pinterest.com/courtneywval/
Email: courtneywval@gmail.com

Tuesday, March 31, 2015

10 Life Hacks For Everyday Living


Yesterday I caught the last 5 minutes of a show on TV that does different life hack trials. I was so inspired that I am going to share with you 10 life hacks I use on a daily basis.
 (Well almost daily)

Enjoy!

1. Use a coffee filter to clean windows and mirrors for fuzz-free cleaning.

2. Mix 1 Tbsp of fabric softener and  1/2 Tbsp baking soda with 2 cups of water in a spray bottle for homemade fabric refresher. This is also great to spray on car seats and floorboards.

3. Place a bobby pin at the bottom of your skincare, makeup, or toothpaste tubes. Squeeze it upward as you use the product to get out every last drop.

4. Out of hairspray? Mix 1 part sugar with 1 part water in a spray bottle. Shake and spray to control frizz and fly-aways. NOTE: It is not recommended to use this on summer nights as mosquitoes will eat you up!

5. Freeze coconut milk, almond milk, or dairy milk in an ice cube tray and then add one cube to your morning coffee for the perfect dose of creamy goodness. In the summer add 5 cubes to 12 oz of cold coffee for a delicious iced coffee treat.

6. Mix 2 oz of rubbing alcohol with 1/2 oz of lotion in a travel spray bottle for moisturizing hand sanitizer. (I have a video about this on my YouTube channel- watch it here)

7. Use empty tampon or other feminine product boxes to hide your valuables when traveling. Thieves won't go snooping in there.

8. Rinse your hair with 1 part apple cider vinegar and 1 part water once a week to give it extra shine and volume.

9. To help really dry skin add melted coconut oil to a warm bath and soak for 20 minutes. Massage it into your skin while you're still in the tub. When you get out pat, not rub, yourself dry with a towel. This may leave a residue in your tub but it is worth it, I promise!

10. To clear up acne blemishes- Crush up 2 aspirin and mix with 1 Tbsp of water until it makes a paste. Apply only to the blemishes like a mask and let it sit on for 10-20 minutes. ** If at any time it starts to burn really bad wash it off immediately.


I hope one or more of these will be helpful to you. I would love to know your favorite life hacks so let me know in the comments or on any of my social media sites.

Have a great day!

Other places to find me:
Youtube: https://www.youtube.com/user/TheImperfectpearl
Instagram: https://instagram.com/courtney.val/
Twitter: https://twitter.com/courtneywval
Blog: http://www.imperfectpearl.blogspot.com
Pinterest: https://www.pinterest.com/courtneywval/
Email: courtneywval@gmail.com

Monday, March 30, 2015

5 Overnight Oats Recipes To Try This Week


Yesterday I posted a picture on my Instagram (follow here) of some Sunday prepartions I did for my busy work week. I am trying to get into the habit of preparing meals, setting out clothes, and planning activites each Sunday to make life much easier during the week. One of the things I always do is prepare breakfasts for the week. Last week I made the health muffins and this week I prepped Overnight Oats.

If you are a Tone It Up girl then you will be very familiar with this recipe. It is so easy to make and personalize with the ingredients you like. The base is 1/4-1/2 cup of quick oats and unsweetend almond milk (you can use any milk you like). To prepare you just add your ingredients to a mason jar or small container and then cover everything with your milk,sti, and leave it in the fridge while you sleep. I would add a generous amount of milk because the oats will soak it up overnight. Hence, Overnight Oats. Some people like to eat them cold straight out of the jar but I like to heat mine up in the morning. It's all up to you.

Here are 5 of my favorite Overnight Oats recipes:

Double Almond
1/4 cup of  oats
1 scoop protein powder
Dash of cinnamon
1 pkt of stevia
1 Tbsp of almond butter
Almond milk to cover oats

Chocolate Covered Coconut
1/4 cup of oats
1 scoop PB2 chocolate OR any chocolate nut butter
1 pkt stevia
Coconut flakes
Coconut milk to cover oats

Blueberry Muffin
1/4 cup oats
1 Tbsp protien powder
Dash of cinnamon
2 tsbp of agave nectar
Handful of blueberries
Almond milk to cover

Chia Strawberry
1/4 cup of oats
3 strawberries, sliced
1 tsp of chia seeds
1 pkt of stevia
Almond milk to cover

Banana Nut 
1/4 cup of oats
1 pkt of stevia
1/2 banana, sliced
1 handful of walnuts
Almond milk to cover


These are just 5 of my favorite recipes but the possibilites are endless! Let me know your favorite quick morning recipes.

Thanks for stopping by and have a great week!


Places to connect:
YouTube: https://www.youtube.com/user/TheImperfectpearl
Instagram: https://instagram.com/courtney.val/
Twitter: https://twitter.com/courtneywval
Blog: http://www.imperfectpearl.blogspot.com
Pinterest: https://www.pinterest.com/courtneywval/
Email: courtneywval@gmail.com