Pages

Showing posts with label diy. Show all posts

Friday, March 27, 2015

DOLLAR TREE DIY: Make Your Own Swatch Book


I've got a helpful DIY that you can do this weekend while you're watching Netflix, TV, or YouTube.

I just posted a video on my YouTube channel. (find it here). That video is all about how you can swatch your beauty products and organize those swatches in a book. This is a great way to organize your makeup and know exactly which shades you have or don't have. I like to take this lightweight book with me when I go shopping. When I see a lipstick I want to buy I can instantly check my collection to see if I have that shade. How great is that?!

This is also good to have if you are a makeup artist. Your clients can easily see which shades they have to chose from.

Additional tips:
~Cover each swatch with clear tape to keep the product from transferring onto the plastic covering of your photo album pages.
     ~You could also laminate the swatch sheets
~Swatch anything you want! You can swatch lipsticks, nail polishes, eye shadows, or blushes.
~You could handwrite each product name but I think it's best to type up the names. Then again, I have bad handwriting. Haha
~Share your swatch book with a friend so they can see swatches of products they might be interested in purchasing.
~Another option is to print out photo swatches from the internet of your products.
~Instead of swatching items on your hand in-store; bring a blank sheet of paper to make swatches. You can add a category in your book which has swatches of products you would like to buy in the future.

Check out my video below:


Let me know if you have other  video or post requests. Thanks for stopping by!


Saturday, August 16, 2014

NEW VIDEO: Girl Scout Cookie Thin Mint Body Scrub (Plus The Story Behind It)

Hello!

I just posted a new video to my YouTube Channel that shows you how to make your own body scrub that smells just like a Girl Scout Thin Mint cookie! You can watch the video here.

If you saw my Tree Hut products review then you may remember I mentioned that I wanted to try coffee body scrubs for their exfoliating and firming properties. Before I ran out and bought one I decided to make my own. I simply mixed coffee grounds and coconut oil together and scrubbed away in my bath. After I drained the water from my tub there was quite a mess so I whipped out my Dr. Bronner's Peppermint soap to clean it up. As I was cleaning I noticed the coffee and Dr. Bronner's scents combined smelled just like a Thin Mint Girl Scout cookie. (light bulb moment!) I added one more secret ingredient (watch the video to find out!) and I had a delicious smelling body scrub.

So, that's the little story behind this DIY. It's super easy to make so check out my video and make your own!

Here are links to other related videos:

Dr. Bronner's Magic Soap Review
Tree Hut Products Review

Have a great day and don't forget to subscribe to my channel for my DIY videos! Also feel free to leave any video requests in the comments section. I am always open to suggestions.


Courtney

Sunday, June 8, 2014

Date & Coconut Treats

Aloha!

Today I have a quick treat recipe to share. I was inspired to make these after I saw some delicious looking coconut macaroons in the bakery case of a local coffee shop. These are my version of those macaroons.


What You Need:

  • A food chopper or processor
  • 3 Dates with the seed removed
  • 2 Tbsp of unsweetened coconut flakes
  • 1 Tsp of sweetened coconut. Alternatively you could add in 1tsp more of unsweetened coconut along with a little sugar or stevia.
  • Spoon


Directions:

  • Add in ingredients 
  • Pulse the food chopper in slow bursts at first to break up the dates and then let it blend until you reach a consistency that looks like this:


  •   Then spoon out a little of the mixture and roll it into a ball or form into a cookie shape, depending on what you prefer. 
  •  Place the finished treats into cupcake liners and enjoy immediately or place in the fridge to enjoy later. 
Here are what my finished treats look like:


Close up:


These are a great way to satisfy your sweet tooth without overdoing it. They are vegan, gluten-free, and all natural. You can't get much better than that!


Have a date day...I mean great day! :)


Friday, June 6, 2014

DIY: Make Your Own Vegetable Make-up!

Hola!

A few days ago I posted a video on my YouTube channel demonstrating how I made some all natural, allergen-free veggie make-up. You can check it out HERE or watch below.

If you want to follow along with the video here are ingredients you will need:
~ 1-2 slices of beet
~Food processor or food chopper.** I got my little food chopper at Walmart for about $8.
~2 tbsp of water
~A small mixing bowl and spoon
~1 tsp of coconut oil heated to a liquid
~Small container to store your product
~Freezer

**You could also juice some beet if you prefer.

This product gives your lips a really nice rosy tint similar to the Benefit Bene-tint. I love it! It is also really moisturizing. It works best on your cheeks if you dab it in the area you want and blend QUICKLY. As is the case with most liquid/cream blush products you don't have a lot of time to work. If you get a too much on or the color spreads where you didn't want it, you can always go over that area with your foundation or powder brush.

Ok, and now for the final test....before and after!

Before:
After:


Ta-da!  I hope you enjoyed this post and let me know if you try this yourself.

Have a great weekend!


Saturday, May 24, 2014

Meet My Rabbit + Making Chew Toys

Hey there! Today's post is for all you rabbit lovers out there. If you don't have a pet rabbit then share this post with someone who does! :)

If you have a pet companion of any kind then you know how costly buying pet toys can be. I love my dear bunny so I don't mind shelling out some cash for her toys but I do love when I can make her toys for FREE.

This is my lovely pet rabbit, Luna.
Luna is a 7 month old female Havana rabbit. Her likes include bananas, chasing towels,head rubs, and chewing on anything that doesn't move.

Rabbits have a natural instinct to chew so it is very important to provide plenty of chew toys to keep your rabbit happy. This will also keep them from destroying your furniture. About a month ago I bought a toy pine cone from a pet store for around $4. Luna enjoyed the toy so much I decided to search my local flora for more bunny toys.

Here is my method to prepare pine cones from your local pine trees to use as rabbit chew toys. This might also be a toy option for hamsters, guinea pigs,or other small animals but I would check with your vet first to make sure it's safe.

Before you start:
Make sure you are choosing pine cones from a tree that has not been sprayed with pesticides. Pesticides can be very dangerous to your little bun.  Also make sure the pine cones are completely free of sap.

Step 1: Soak the pine cones in a solution of white vinegar and water. If needed use a toothbrush to remove any dirt.

Step 2: Preheat your oven to 200 degrees.

Step 3: Use nail clippers to clip off the sharp points from the scales. Also clip off any prickly points on the top and bottom. Rub your fingers all around the pine cone to make sure you have removed anything that could potentially hurt your pet.


Step 4: Line a baking sheet with aluminum foil and arrange the pine cones on the sheet.

Step 5: Bake the pine cones for 30-40 minutes or until the scales start to open a bit and the entire cone is dry. Let the pine cones completely cool before giving them to your rabbit.

Step 6 (optional): For an additional treat you can brush on a little mashed banana right before giving the toy to your bunny. Bunnies love banana.


Additional Tips:

  • If you are concerned your pine cones have bugs place them in an air-tight bag for a few days. When you remove them from the bag use a toothbrush to clean in between the scales to remove the dead insects.
  • Do not store pine cones with banana on them. They will mold and ruin your chew toys. 
  • If you notice mold growing on either prepared or unprepared pine cones throw them away and do not give them to your rabbit.
  • If you are unsure about whether or not this toy is right for your specific rabbit consult your vet. 


I really hope you and your furry friend have enjoyed this post! Let me know if you would like to see more pet related posts.

Have a great day!

Other places to connect:
Twitter: @imperfectperla
Youtube Channel: www.youtube.com\TheImperfectpearl or click here


Friday, May 23, 2014

New video: Chats about conditioner

Good morning! 

Before you take your morning shower check out my latest video on how to make your own cleansing conditioner. It's  comparable to the Herbal Essence cleansing conditioner but half the price AND cruelty-free! 

Check it out here: 


Have a great day! 

Tuesday, May 13, 2014

DIY: Recycled Box Lipstick Holder

Well hello there!

I have been getting into more DIY (Do It Yourself) projects lately and this past weekend I tried a little experiment that actually worked out, so I thought I would share it with you. Since I didn't plan to make a post out of this when I was making my lipstick holder I didn't take step by step pictures like I normally do. Sorry!

DIY: Lipstick Holder

What You Need: 

~Empty rectangle cardboard box. I used an empty Nature Valley granola bar box.
~Extra cardboard box.
~Sharp knife
~Scissors
~Hot glue gun and glue sticks.
~Ruler
~Pen/pencil

What To Do: 

1. Remove any flaps so that your box has one open end. If your box is more than 3 inches high you will want to trim it down a bit so you will be able to see the lipsticks.

2. From the bottom of your box measure up 3inches and mark it with your pen. Draw a line above this mark around 3 sides of the box.

3. Using a very sharp knife or scissors cut out those three sides, leaving the back flap if you like. Leaving this back flap will make your holder more sturdy.

4. Now turn the box with one of the shorter sides facing you. Take one of your biggest lipsticks and line it up with the far edge. Make a small mark with your pen on the opposite side of the lipstick. Repeat this step until you reach the other side of the box.

5. Count the marks and this will be how many strips of cardboard you need to cut to make your rows.

6. Now measure the entire length of your lipstick holder and then cut the row strips from your extra cardboard box. The height of the strips should not be shorter than 1 inch.

7. Transfer the marks you made on the side of your box to the inside so you know exactly where to place each row.

8. Using your hot glue gun spread a line of glue on both ends of your row strip and then place it carefully into the bottom of your box.

9. After gluing in each row place in a lipstick and make sure you have enough room in-between the rows for your lipsticks to fit.

10. Repeat until you have finished all of the rows.

11. Next, place your lipstick up against a row and make a mark along its left side on the inside of the box. This will tell you where to place your divider.

12.  Cut a few more long strips from that extra cardboard box. The cut off approximately 1/2 inch squares to use as dividers.

13. Glue in your dividers at approximately 3/4 inch intervals. The best way to know exactly how much space you will need between dividers is to use your actual lipsticks. Place one in, mark how much space it needs, remove it, and glue in your divider. As you can see in my picture not all of my dividers are perfectly lined up and that's OK.

14. Repeat until the entire bottom of the box has smaller boxes for your lipsticks.

15. Place in all of your lipsticks and you are done!

16. If you want you can paint or decorate the lipstick holder however you like.


I really hope that wasn't too confusing. It's actually really easy once you get going. From start to finish it took me less than an hour to complete my lipstick holder.

Here is my finished product:


Let me know if you have any other ideas for organizing makeup. Also leave any comments or questions below. Or you can tweet me @imperfectperla. You can also visit my YouTube channel here for more content like this.

Have a great day! :)

Courtney

Monday, March 3, 2014

Check out my new YouTube Channel!

Hello everyone!

I want to share some fun news with you. I decided to start a YouTube channel. Woo hoo!!

I started this blog and now this channel as a sort of self-care project. My day job involves hearing about a lot of traumatic events so it's good to have a positive outlet to relieve stress. Plus I think it might be fun!

Head on over to My YouTube Channel to check out my first few videos. Please subscribe and leave comments telling me what other kinds of videos you would like to see. You can also Tweet me your requests or comments @imperfectperla.

Some of my future video ideas include:
~Health product reviews
~Cooking/baking tutorials
~Craft DIYs
~Budget-friendly videos
~Beauty, makeup, and fashion
~Motivational and self-care topics
~ Your requests! :)

I hope you're having a great start to your week!


Courtney


Tuesday, January 7, 2014

How To Tuesday/Wednesday: Make Delicious Roasted Chick Pea Snacks!

Good Evening!
 
Today I want to share a delicious chick pea snack recipe. I have been working for a while to figure out the right technique to make my chick peas crunchy and not chewy. These are a great healthy snack and making them yourself will save you a lot of money. The average bag of roasted chick pea snacks retails for about $2 per serving.  With this recipe each serving is only about $.50. That's incredible!
 
  
What You Need:
1 Bag dry chick peas
Large Bowl (for soaking)
Small Bowl (for mixing)
1 tbsp. Olive Oil
Salt or Spice of your choice
Baking Sheet
Aluminum Foil (optional)
Vented Pizza Sheet
Paper towel
 
The Night Before:
Soak dry chick peas in enough water so that all beans are covered. I suggest using dry beans over canned because they don't contain any additives, salt, or sugar. Plus, they are usually cheaper!


What To Do:
  • Preheat your oven to 400 degrees Fahrenheit.
  • In the smaller mixing bowl coat 1 cup of chick peas with the olive oil.
  • Then add in your spice, making sure all of the chick peas are covered.
  • Line you baking sheet with aluminum foil to catch any oil drips.
  • Place the vented pizza sheet on top of the baking sheet.
  • Then spread your chick peas onto the vented pizza sheet.
  • Bake for 30 minutes.
  • After 30 minutes taste one chick pea from the center and outer edge of the vented pizza sheet. Fully roasted chick peas are crunchy and may have browned slightly.
  • Remove all fully roasted chick peas and set them aside in a small bowl.
  • Any remaining chick peas that are not fully roasted can go back in the oven for another 10-15 minutes. Check on them every 5 minutes though to make sure you don't over-roast or burn them.
  • After all the chick peas are fully roasted spread them out on a paper towel to absorb any excess olive oil.
  • Add extra seasonings to taste. I like to put them in a zip lock bag and shake them with some spices.
  • Then enjoy and share with a friend. :)
Fun Facts About Chick Peas!
India is the #1 producer of chick peas
Chick peas are high in fiber, iron, magnesium, zinc, and essential amino acids.
"Chick pea" comes from the Latin word "cicer"
They are perfect at stabilizing blood sugar and recommended for diabetics.
There are two types of chick peas: Kabuli (larger) and Desi (smaller).
 
 
I hope you all are having a great day and enjoy this tasty, healthy snack.
 
Paz,
C
 
 
P.S. Let's talk! Tweet me suggestions for recipes or post topics @imperfectperla or leave a comment below. I'd love to hear from you!


Sources cited:
http://en.wikipedia.org/wiki/Chickpea
 
https://www.integratedbreeding.net/chickpea-facts-figures


Tuesday, December 17, 2013

How To Tuesday: Recycle Magazines and Boost Your Mood

Happy Tuesday!


In today's post I want to share with you how I take a giant stack of magazines and turn it into a compact book. It's super easy and a great way to have all your favorite articles in once place. Plus it is a great way to boost your mood! (keep reading to find out how)

What You Need:
  • Your stack of magazines. I like to stick with one type of magazine per book but you can mix magazines if you want.
  • Three-hole binder
  • Scissors
  • Clear sheet protectors. Make sure to get sheet protectors that already have holes punched in the side.


How To:
  • Grab your stack of magazines and organize them by type of magazine.
  • Flip through each magazine and cut out each recipe or article that you want to keep.
  • Create different piles for your articles. For example I divided mine into three piles: recipes, workouts, and beauty/fashion.


  • Slip the articles into the clear sheet protectors and then pop them into your binder. You may want to use a separate blank sheet of paper to make a divider to separate each of the different themes within your binder.
  • Optional: Make a decorative cover or label for the front of your binder. 

To prepare for this project I like to make a cup of my favorite coffee, tea, or hot chocolate and get snugly on the couch. I also like to turn on my favorite music or movie. I found this project to be a great way to unwind while still keeping my mind active.
 Sometimes a small project can have a big effect on your mood. The act of organizing stimulates the left side of your brain and when you are able to easily complete this project you are rewarded with a sense of accomplishment. In addition, the act of creating something or looking at creative content keeps the right side of your brain happy. In combination your brain produces more serotonin. (The chocolate can help too!) Serotonin makes brains happy. A happier brain means a happier you! So the next time you are feeling a little down grab that stack of magazines and those mood-boosting juices flowing.


I hope you enjoyed this fun little DIY. If you make a binder like this let me know what magazines or recipes you used in the comments below! You can also tweet me @imperfectperla.

Have a great day!


Tuesday, October 15, 2013

How To Tuesday: Make Your Own Custom Make-up Palette

It's DIY time!

I thought of this last week when I was repurposing empty containers...ok, trash. It didn't really fit in the same theme as those other products but I still thought you might be interested in trying this.

 This is a great way to use an old DVD case to make your own custom make-up palette.

Here's what you need to do:

1. De-pot the eye shadows, blushes, bronzers, or lipstick pans you want in your palette.
   
 2. Arrange the products in the palette so the DVD spool is not hitting any products. If you want to get extra crafty you can take a very sharp knife and actually cut out the DVD spool. Alternatively you could place the products in the circle of the spool.

3. Next, take some super glue and glue in your products. Make sure you are comfortable with the arrangement before hand because the super glue is not easy to remove without ruining your product.

4.  Then take out the inside cover and trace it's shape around the new cover you want on your palette. I chose to use a pretty piece of card stock but you might also consider printing something on your computer with a title for your palette.  

5. Slip the new cover in place and you are done!

 
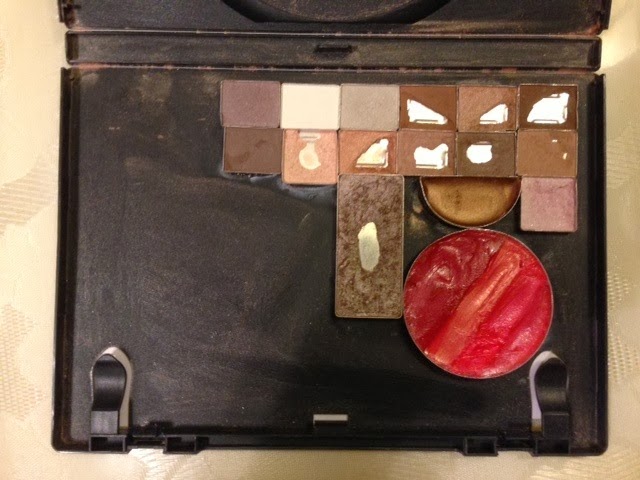
Here is a picture of one I made. I chose a piece of pink damask card stock as my cover because I LOVE all things damask.


Here is the inside. As you can see mine has been well loved. 
 
 
Also, if you are wondering how to de-pot products here is the way I usually do it. You will need a lighter or a lit candle and a safety pin or needle.
 
1. Hold the flame under the product to loosen the glue holding the product in its pan.
You may need to wear a protective glove or hold the container in a cloth because the container may get very hot.
2. Next very carefully try to slip the safety pin in between the product's container and the pan. Lift up ever so gently to remove the pan.
 
This sounds much easier than it actually is unfortunately. It may take a few attempts before the pan comes out. I would also recommend you try this method on a cheaper product you don't care as much about because it can take some practice to get it right and you don't want to ruin any of your favorite high end products.
 
Have a beautiful day!
 
C