Pages

Friday, December 20, 2013

Video: Holiday Health Travel Essentials

Hello again, 

I hope you are having a great week. Today I wanted to share with you a little something different: a video!

Today I am traveling back to my hometown for a 10-day trip to celebrate the holidays. I couldn’t be happier to spend time with loved ones but unfortunately my family and my husband’s family have all been sick. Last year I came down with a horrible flu on Christmas Eve so this year I am packing an artillery to protect myself against those nasty cold and flu viruses. I hope you enjoy this little video and please let me know if you would like to see more videos. 


 I would love to know your recommendations for vitamins or supplements. Let me know below or tweet me @imperfectperla


Happy Holidays and Safe Travels!


Tuesday, December 17, 2013

How To Tuesday: Recycle Magazines and Boost Your Mood

Happy Tuesday!


In today's post I want to share with you how I take a giant stack of magazines and turn it into a compact book. It's super easy and a great way to have all your favorite articles in once place. Plus it is a great way to boost your mood! (keep reading to find out how)

What You Need:
  • Your stack of magazines. I like to stick with one type of magazine per book but you can mix magazines if you want.
  • Three-hole binder
  • Scissors
  • Clear sheet protectors. Make sure to get sheet protectors that already have holes punched in the side.


How To:
  • Grab your stack of magazines and organize them by type of magazine.
  • Flip through each magazine and cut out each recipe or article that you want to keep.
  • Create different piles for your articles. For example I divided mine into three piles: recipes, workouts, and beauty/fashion.


  • Slip the articles into the clear sheet protectors and then pop them into your binder. You may want to use a separate blank sheet of paper to make a divider to separate each of the different themes within your binder.
  • Optional: Make a decorative cover or label for the front of your binder. 

To prepare for this project I like to make a cup of my favorite coffee, tea, or hot chocolate and get snugly on the couch. I also like to turn on my favorite music or movie. I found this project to be a great way to unwind while still keeping my mind active.
 Sometimes a small project can have a big effect on your mood. The act of organizing stimulates the left side of your brain and when you are able to easily complete this project you are rewarded with a sense of accomplishment. In addition, the act of creating something or looking at creative content keeps the right side of your brain happy. In combination your brain produces more serotonin. (The chocolate can help too!) Serotonin makes brains happy. A happier brain means a happier you! So the next time you are feeling a little down grab that stack of magazines and those mood-boosting juices flowing.


I hope you enjoyed this fun little DIY. If you make a binder like this let me know what magazines or recipes you used in the comments below! You can also tweet me @imperfectperla.

Have a great day!


Tuesday, December 3, 2013

How To Tuesday: Make Your Own Healthy, Travel-Friendly Coffee Creamer

Happy December Lovelies!

Today we're talking about one my favorite things in this whole wide world: coffee. During the colder months I like to change up my morning coffee routine and add some creamer. There is just something so comforting about a hot, creamy cup of coffee on a chilly winter morning.  Usually I like to add almond, soy, or coconut milk as my creamer but I have been traveling a lot lately and it's not easy to constantly have one of those on hand.

 So, I did some experimenting and found a way to create my own healthy travel-friendly dry coffee creamer. I know many people will be traveling for the holidays so I thought I would share this quick little "How To" in case you want to try it for your next trip.

I actually made this specific batch last week when I was traveling to a tiny town in Mississippi and I knew my options would be limited. I packed it beside the baggie of stevia packets that permanently lives in my purse.

What You Need:
~1-2 Scoops protein powder. Mine is the Vanilla Nutribiotic
~1-2 Packets of Stevia
~ 1 tbsp. Unsweetened Cocoa Powder (You can add more or less depending on what you prefer)


You just pour the ingredients into a travel size baggie and shake, shake, SHAKE! Make sure it's  closed all the way before shaking. I learned the hard way.
 
It should look something like this:


Tip: I have found the best way to mix this into coffee is to add the creamer to your cup first with a little bit of coffee. Then, with a fork mix in the creamer really well. Add the rest of your coffee to the cup and enjoy! If you are at a coffee shop you can also ask the barista to add a splash of soy milk, which will help the creamer more easily blend.
 
Essentially the protein powder and stevia are the base for your creamer but you can add in whatever flavorings your like.

 
Here are some other flavor combinations I want to try:
 
Peppermint Mocha: Chocolate protein powder, stevia, cocoa, crushed all-natural peppermint sticks.
Flavor Of Fall: Vanilla protein powder, stevia, nutmeg, and cinnamon
Chai: Vanilla protein powder, cinnamon, allspice, and clove.
White Chocolate Mocha: Protein powder, cocoa, stevia, natural white chocolate chips (I found some at Trader Joe's)
Peanut Butter Cup: Chocolate protein powder, cocoa,  stevia, and PB2
 
Let me know if you have any other flavor ideas in the comments below or tweet me @imperfectperla
 
 
Have a great day!


Tuesday, November 19, 2013

How To Tuesday: All Natural Nourishing Face Spray


Sometimes the best things in life are the most simple. Today's post is inspired by that concept. Each year, as winter approaches my skin tends to get dry and lifeless. Now, I could run out to the store and pick up an expensive, chemical laced product and just call it a day but I prefer to see what I can make myself with pure, simple ingredients.

I actually made this spray last Thursday and I have been using it twice a day everyday as a test  before writing this post. So far I am very pleased with the results. My skin feels softer and looks brighter.  In case you are wondering I have combination skin which tends to lean more on the dry side, especially in the winter. This spray will work on all skin types but if you have particularly oily skin you might add a few drops of Witch Hazel.

What You Need:
~1 cup of filtered water
~Pure Vitamin E oil
~The petals from 2 Roses OR pure rose essential oil drops. (Make sure the type of oil you use is safe to be applied onto skin. Do not use aromatherapy oils)
~Small spray bottle.
Optional: Witch Hazel if you have oily skin.


Directions:

Bring the 1 cup of filtered water to a rolling boil and then place your rose petals into the water. Reduce heat to medium and let the petals boil for about 2-4 minutes. Then remove the pot from the heat and let it stand until cool.


Once the water is cool fill your spray bottle about 3/4 full with the rose infused water. Add  2-3 drops of Vitamin E oil to the bottle. If you want a more moisturizing spray add a few more drops of the oil.
If you have oily skin you can add a little witch hazel to create a gentle toner for your skin.

Shake the bottle vigorously and hold it about 6-8 inches from your face. After you have cleansed your face, close your eyes, and spray the rose infusion all over your face. Let the mist dry and then apply your regular moisturizer or serum.

Enjoy and I hope you all have a beautiful day!

Peace,

C


Thursday, November 14, 2013

Essential Health Foods For Just $1.


Today I wanted to share with you some of the health foods I have found and frequently purchase at my local Dollar Tree store. One reason people give for not eating healthy is that health foods are just too expensive. That can be true if you don't know where to shop. I found these items particularly helpful when I was in college and money was very tight.  

There are some health foods you can't get very thrifty with like specialty foods and organic produce. So my thinking is to save where you can so you can spend more on those specialty foods. I know there are Dollar Tree stores in the US and Canada but I'm not sure about the rest of the world.  I've been to similar stores in the UK so I encourage everyone to look for these items in their local "dollar" store. 

I chose these items based on ingredients and overall nutritional value. 

1. Flax Seed.
2. Quick Oats.
3. Tea bags. My favorite kind is by the brand Queen's Choice. 
4. Sugar In The Raw. 
5. Dry black beans. I've also seen dried kidney and pinto beans but it seems to depend on the store. 


6. Brown rice. 
7. Organic Soy Milk. 
8. Luna and Cliff Bars
9. Sea Salt
10. Seasonings. (Cinnamon, garlic, cayenne,etc. )
11. Frozen white fish. Not all Dollar Tree stores have a frozen section but the ones that do have a pretty good selection.
12. Frozen veggies and fruit. 
13. Canola spray for cooking
14. Rice cakes
15. Nuts, seeds, and dried fruit. 
16. Tuna in water. A nutritionist once told me to limit canned or pre-packaged tuna to 1-2 times per week but, if you're in a hurry or on a budget it's a much better option than the dollar menu. 


Aside from food products I have also found some personal health products which I buy on occasion. 
1. Vitamins. You should check the ingredients for each type though. I like the Vitamin E and Gingko Biloba.  
2. Antacids


3. Epsom salt for soaking sore muscles. 
4. Intimate cleansing wipes. Is that TMI, ladies? Sorry!
5. Toothpaste and toothbrushes 


Alternatively there are things I absolutely stay away from at these types of stores because of the dangerous chemicals they can contain.

~Body lotion- Holy parabens!
~Cookies, candy, chips- Sucralose. 
~Juice-100% sugar water
~Coconut water- This is a tricky one. It seems healthy but if you look at the ingredients they add a 
bunch of extra sugar. 
~FullBar- This looks like an innocent granola bar that is supposed to suppress your appetite but it's loaded with chemicals. 


As always you should look at the ingredients of each individual item because some products can vary from store to store. 

Let me know if you have visited a similar "dollar" store and what items you've found! I love being healthy and I love a deal. 


Have a fabulous day!

Peace, 

Courtney


Tuesday, November 12, 2013

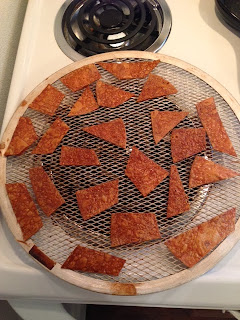
How To Tuesday: Gluten-Free Chips


Good Evening! For some of you this will be more of a "How To Wednesday" since I'm posting it so late on Tuesday. Sorry about that. I've been feeling sick with a bad cold.

This past weekend I made a trip to Trader Joe's while I was in the DC area and I picked up one of my favorite items to make my own chips. These brown rice tortillas cost $1.99 for a pack of 6 tortillas. They are wheat and gluten free so your tummy will stay happy while you enjoy this snack.

 
You can also use this same process with any tortillas you like. I find these chips are great on their own or with hummus. Enjoy!

What You Need:

~Tortillas
~Sharp knife
~Cutting board
~Olive oil
~Sea salt or your favorite spice
~Vented pizza pan or baking sheet

Steps:

1. Preheat oven to 350 degrees.
2. Using a sharp knife lay one tortilla on the cutting board and cut into bit-sized pieces.
 

3. Next place your tortilla pieces onto the pizza pan or baking sheet. If you use a baking sheet make sure to spray it with a little cooking spray.


4. Combine a little olive oil and sea salt into a small dish. You can also add in garlic, cayenne, or any spice you like.


5. Using a pastry brush or the back of a spoon lightly spread a little of the oil and spice mixture on the tortilla pieces. If you are using the Trader Joe's brown rice tortillas you need only a very little amount. If you use too much the chips will burn.

6. Bake the chips at 350 degrees for 8-10 minutes or until they are golden brown. If you are using a baking sheet flip the chips half way through the baking time to brown both sides.

Here is the finished product:


These were so delicious I may or may not have eaten all of these in one sitting. Opps!

I hope you all are having a fabulous day and if you have any other suggestions for How To Tuesday please comment below!

Peace,

C


Tuesday, November 5, 2013

How To Tuesday: Make Your Own Kombucha


Hello lovelies.

Today I am sharing my method for making Kombucha. Kombucha is a probiotic tea made from a mushroom culture. If you've never seen a Kombucha culture it may look a bit scary, like something from a science lab, but it is completely safe. Drinking Kombucha regularly helps balance the PH in your body. This is especially important if you consume alcohol or coffee. Kombucha also aids in digestion, is high in antioxidants, and boosts energy levels. It has also been said that Kombucha prevents grey hair and helps relieve depression, but those statements have not been evaluated but any medical organization. If you have serious health concerns or are pregnant you should consult your doctor before drinking Kombucha.

I started drinking Kombucha because I was experiencing mysterious stomachaches that not even my doctor could figure out. I tried over the counter medicine and nothing worked so I decided to search for a natural remedy.  I've found drinking Kombucha has really helped regulate my digestive system. I rarely have those horrible stomach pains or cramps anymore.  I also notice a definite increase in energy and an elevated mood when I drink Kombucha.


What You Need to Get Started: 
1 Gallon glass jar or container. Never use plastic to brew Kombucha.
32 oz of filtered water
Extra filtered water to top off brew
4-7 tea bags. Organic non-flavored tea is best. I like to use black tea. It is best to only use one type of tea per SCOBY. You can always add flavors in the second fermentation.
1 cup of sugar
Dish towel or cloth
Rubberband
Kombucha SCOBY (the culture)
1 cup starter tea. Usually cultures will come packaged in this liquid. If you get a SCOBY from a friend just ask them to include some of the tea.
Vinegar for sanitizing Kombucha container


Steps for Successful Brewing: 

1. Sanitize the glass container with vinegar. Do not use soap as it will kill the Kombucha culture.

2. Bring 32 oz of water to a boil and add your tea bags. Let the tea brew for about 10 min. Remove pot from heat.


3. Stir in the 1 cup of sugar.


4. Let the tea cool slightly and then add it to your glass jar or container.


5. Gently place your SCOBY into the tea mixture along with about 1 cup of the starter tea.


6. Add cold filtered water on top, leaving about 1-2 inches of room.


7. Place the cloth over the opening of the jar and secure it with a rubber band.


8. Sit the jar in a dark, warm place in your home.

9. Check your brew everyday for signs of mold. Mold is uncommon but if your culture develops mold you have to throw the whole brew out and start over with a new culture.

10. After 7 days taste the Kombucha. If your brew is too sweet let it brew for a few more days. If it is too tart decrease your brew time in the next batch. For too tart or vinegary tasting batches you can add some fruit juice to them to even out the taste.  A good brew will be slightly carbonated and you will be able to see strands of yeast developing.


This is the basic recipe for making Kombucha. After you have brewed the Kombucha you can put it in separate glass jars or bottles for a second fermentation. Simply add fruit and let it ferment for 24-48 hours.  My favorite fruits to add are pineapple, strawberries, and blueberries. You could also add a little 100% natural fruit juice as a flavoring.

If you need a starter SCOBY let me know in the comments section as I always have extra cultures and I would be happy to send you one.

Happy Brewing!

C


Tuesday, October 29, 2013

How To Tuesday: Cure A Stomach Ache Fast!

Hello Friends.

Today I wanted to share with you a really easy, yet effective way to cure a stomach ache. My stomach has been bothering me lately and I find this little concoction works really well.


As you can see there is a bottle of the obvious generic antacid tablets which I always keep on hand. They work well to cure a minor upset stomach but for a more serious stomach situation I turn to my spice pantry.

If you don't already have crushed mint in your spice collection I highly recommend it. When my stomach starts getting sassy with me I like to add 1/2 tbsp-1tbsp of crushed mint to 16-20 oz of green tea. This Green Tea Kombucha by Yogi Teas is a particular favorite of mine and the Kombucha adds extra digestive benefits.

If your stomach is feeling especially icky you can also add a sliver of fresh ginger to the tea.

Side Note: I have seen peppermint and ginger oils sold in health food stores. Adding 1 drop of each the peppermint and ginger oil in your tea or hot water will provide the same relief. You need to make sure you are purchasing oils meant for consumption and not aromatherapy oils.

The Science Behind It All

This combination of ingredients is no accident of experimentation. All three have very specific properties which promote stomach ache relief and digestive health.

Peppermint is a natural carminative which stops bloating and gas. It can also relieve indigestion by calming any excess of acid in the stomach.

Ginger contains ginergols and shogoals which relax intestines, eliminating nausea and cramps. It is also a mild anti-inflammatory and promotes healthy circulation within the body.

Kombucha is an ancient remedy but has recently gained popularity for its probiotic benefits. Kombucha contains good bacteria which helps your stomach more easily breakdown hard to digest foods and harmful yeast. The carbonation can have a similar effect to drinking a Sprite for a stomach ache, but without all the nasty chemicals and sugar.

The next time your stomach starts aching, fear not. The cure is right in your cupboard.


Be Well,

C


Sources:
http://health.howstuffworks.com/wellness/natural-medicine/herbal-remedies/peppermint-herbal-remedies.htm

http://health.howstuffworks.com/wellness/natural-medicine/herbal-remedies/using-ginger-to-treat-upset-stomach.htm

http://www.foodrenegade.com/kombucha-health-benefits/

Tuesday, October 22, 2013

How to Tuesday: Bad to Better

Hello lovelies!

Today I wanted to share with you a little baking "How To" since my last two Tuesday posts were beauty related.

Recently I was cleaning out my cabinets and I found a random blueberry muffin mix. It wasn't an extremely unhealthy mix but it wasn't exactly nutrient rich either.  I thought about donating it to a local women's shelter but when donating food I have one strict rule of thumb: never donate something you wouldn't want to eat.

Instead of tossing it completely I decided to take the mix and see what I could do to make it a little more nutritious.

 To bring down the glycemic index and add extra protein I added one scoop of NutriBiotic Vanilla Brown Rice Protein powder to the muffin mix.


In place of the milk the recipe called for I added half organic plain yogurt and half water. I find that adding yogurt helped balance the protein powder, which can sometimes dry out your batter or leave a chalky taste. Luckily I have never really noticed a chalky after taste with the NutriBiotic protein powders. The yogurt also added protein and calcium to the muffins.

For another boost of nutrients I added about 2 tbsp. of sesame seeds to the mix. Sesame seeds are a great source of copper, zinc, magnesium, calcium, and iron.You could also add chia seeds, chopped almonds, or walnuts.

I then mixed it all together with a wire whisk. I find using a whisk is the easiest way to mix protein powder into batter.


I decided to make mini muffins for a little built-in portion control.
 Using a measuring spoon I scooped in 1 Tbsp. of batter to each mini muffin mold.


I then followed the baking instructions on the packet, checking the muffins every 5 minutes.
Ta da! Bad to better.


 I did end up taking some of the muffins into a women's shelter and they went over great!


Try this yourself with that muffin or cake mix you have sitting in the back of your cabinet. I would love to know what you added or changed to make the mix more healthy. Let me know in the comments below!

Also, check out this website I found that has nutritional information for all your favorite healthy foods. I literally just spent an hour browsing this site. Love it!
http://www.whfoods.com

Peace, love, and baking!

C


Monday, October 21, 2013

Motivation Monday: Affirmations


Ok, I know some people will read the title of this post and think, "Affirmations are so cheesy."  Affirmations can be really cheesy and can make you feel like you're sitting in the dentist's office staring at one of those motivational posters with a cat hanging from a branch. I promise you the benefits of giving yourself affirmations outweigh any cheese factor.

In my line of work I am often trying to help people solve a problem or crisis. Many of the people I talk to have lost their motivation in life which makes them feel very depressed. This is often the result of some event like a job loss, loss of a family member, or anything disappointing that has happened. I have found that using affirmations can help get back that lost motivation or strengthen the motivation a person already has. 

These are some of the affirmations I find most helpful. They are great for daily use or whenever you're feeling upset.

"I am worth it." 
~This seems so simple but whenever something bad happens a little voice creeps in trying to break down our worth. You can also add intentions after this phrase. "I am worth it to take care of my body." "I am worth it to apply for that job." 

"I am in control of my actions and decisions"
~This is a big one. Control is a bigger force than we all know. When we feel our control over something has been taken away it can cause us to lose hope or to over exert control in another aspect of our life, sometimes to an extreme. Maintaing balance is important for health and happiness. 

"I choose happiness."
~Sometimes happiness comes naturally but other times we have to choose to be happy and we have to choose to not let the negative emotions take over. 

"Today I will do my best."
~ The brain is a powerful machine and if you tell it to perform well, it will.

"Today is going to be a great day."
~Starting your day with this can be a game changer. I believe we all have the power to set our selves up for daily success and happiness by taking in positive thoughts first thing in the morning.

"Don't take it personal."
~I got this one from the book, The Four Agreements by Don Miguel Ruiz. We can cause ourselves pain by thinking another person's actions were directed at us even if they weren't. Sometimes people are just plain inconsiderate of the world around them but that doesn't mean they are specifically trying to hurt us.

"I have the power to make things happen."
~Remind yourself that you are strong enough to make your goals happen.

"I got this!"
~This is good to use right before an exam, presentation, or any event where you need to perform well. Remind yourself how awesome you are and you don't even need to worry because you are going to rock.

"I will stay in the here and now."
~ Enjoy and take in each moment as it comes. Try not to make assumptions about what will happen in the future based on a single event. Plan for the future but work in the present. You cannot change the past or predict the future but you can control your actions in the present moment.

Lastly, using self-validation is very helpful.  There won't always be someone there to pat us on the back and praise us for a job well done. There also may be times when no one is there to hug us and tell us that everything will be OK. So, we have to do this ourselves. Think about what you wish someone would say to you in that moment and simply say it to yourself. Repeat this as many times as you need.

An example of this is :
(Speaking to yourself) "It is OK to feel angry or sad. You have a right to feel this way. It is normal to have this reaction. It's OK. Although things are not going well right now, it will get better. You are strong enough to get through this. You are worth it to keep fighting and to get past this pain."


Try repeating these affirmations 5 times daily and see how much better you feel.

If you try one of these affirmations let me know how it worked for you in the comments below. I hope you all have an amazing week!


Peace,

C


Thursday, October 17, 2013

Body Reboot: Homemade Juice Cleanse

A few weeks ago my husband and I bought a juicer with a gift card someone gave us for our wedding. I have wanted a juicer for a long time so I was beyond excited to juice everything in sight. Over the past two years I have developed a greater focus on nutrition and in doing so I learned that fresh juices can be a great way to get a large amount of vital nutrients without eating pounds of fruits and vegetables. I have also read about juice cleanses where you replace solid foods with nutrient-dense juices for 1-7 days. The goal of a juice cleanse is to rid your body of toxins and give your digestive system a little break.

The reason I wanted to try a cleanse is because I had been so busy with work and traveling I felt I wasn't getting a good dose of the essential nutrients my body needed. I was seeing evidence of this in my skin. I don't normally have break-outs but all of the sudden my skin seemed to be reverting back to its teenage self. I was also feeling very tired and just generally blah.

 I have looked online and in-store at a couple different juice cleanses but one thing always stands out to me: they are so freaking expensive! The average cost per juice is about $7-10. Most cleanses contain 5-6 juices so you're looking at about $60 for one day. Spending that kind of money is just not in my food budget at the moment so I decided to do some detailed research and make my own juice cleanse at a lower cost.

I thought I would share with you how I made the cleanse, how it went for me, and my impression of it overall. Since I have never done a juice cleanse before I chose to just make a one day cleanse to give my body a little reboot.


Disclaimer:  I am not a registered dietitian,  doctor, or nutritionist so you should definitely consult your physician before starting anything like this.

OK, I just wanted to get that out of the way in case someone reading this decides to juice an octopus or something, gets sick, and then says "Hey, that one blog lady made me do it!" Please don't do that. :)

On to the cleanse!

To start this juicing journey it is best to choose organic fruits and vegetables. This will provide you the most amount of nutrients with the least amount of, if any, pesticides. There is a small farmer's market near my home once a week so I chose to get the majority of my fruits and vegetables from there. This is also a great idea because you are supporting your local farmers and that, in my opinion, is just swell!  The rest of the things I needed I bought at a local grocery store and I managed to get everything organic except for the lemons and the beet. In total I spent about $30 on all my fruits and vegetables. After making my cleanse juices I still had a lot of vegetables left over. I estimate each juice cost me $2-3. Of course this may be different for you depending on where you buy your fruits and vegetables.

Next, you will need some glass bottles or mason jars. Most cleansing juices I have found in grocery stores are about 12-16 oz. I am a frequent GTS Kombucha drinker and bottle hoarder so I used 6 empty kombucha bottles to store my cleanse. These bottles just happen to hold exactly 16 ounces.


Now, it's time to get to juicing. Along with your juicer you will need a cutting board and a sharp knife.   Cutting up the fruits and vegetables can help extract the juice more easily. I chose to clean and set out only the items I needed for one juice at a time in order to reduce error in juicing the wrong things. Like I said earlier, I was very excited to be juicing and I tend to get carried away with other things in my life so there was a strong possibility I would just juice whatever was in front of me in a fury of juicing excitement.


The Juices:

I based these juices on a few different cleanses so I am not claiming these are my original recipes. I just looked up a few different cleanses and what each juice contained and then juiced those things myself. Another reason I wanted to make my own cleanse is because I am allergic to kiwi and many store bought juices contain kiwi.

Juice #1
1-2 Apples
6 Stalks of celery
1/2 Cucumber
3 Collard green leaves
Spinach (About 1 cup)
Kale (About 1 1/2 cup)
A sprinkle of mint

Juice #2
4 1/5 Large carrots
1 Orange
1 1/2 Apples
2 Slices Pineapple OR 1/2 Grapefruit
1/2 Lemon
A dash of Turmeric

Juice #3
3 Large carrots
1 Apple
3 Celery Stalks
1/2 Cucumber
1/2 Beet
1/2 Lemon

Juice #4
2 Apples
A LOT of kale
1/2 Lemon

Juice #5
2 Apples
1/2 Lemon
1/2 Cucumber
4 Celery stalks
A handful of Spinach
A handful of Kale
2 Collard green leaves
A pinch of ginger

Juice/Drink #6
10 oz Unsweet vanilla almond milk
1 tsp Honey (Real honey. No honey-like syrups)
A handful of cherries OR 1/2 grapefruit
A pinch of cinnamon
1Tbsp of coconut oil
* For this drink you will mix all ingredients in a blender instead of using the juicer.


The Cleanse

To prepare for a cleanse I read it is suggested you cut out caffeine. I read this the night before the cleanse so this was simply not possible for me. Yes, I am a caffeine addict. When caffeine addicts cut out all caffeine suddenly it can result in a horrendous headache and complete loss of life. OK, that last part is a lie. The headache part is real though and I have felt the rage of a caffeine withdrawal headache before. It is not pretty so I decided to allow myself 1 cup of black coffee in the morning.

I woke up the day of the cleanse at 9am and after my one cup of coffee I drank my first juice. I felt great! The juice tasted great and I had a sudden burst of energy. I happily got ready for the day and started some work. At around 11am I had my second juice. I drank this juice through a straw because the strong taste of carrots was not my favorite but still it didn't taste horrible. After doing some more work I could tell my mood was noticeably elevated. I had some errands to run so I packed my 3rd juice in aluminum foil and headed out the door.
One of my errands took me into the mall where I faced my Goliath: Auntie Anne's pretzels. The smell of warm dough and sugar was like a siren song calling to me. I was strong though and grabbed a cup of hot mint tea at the coffee stand directly across from Auntie Anne's. I win, Auntie.
As soon as I left the mall I opened up the 3rd juice and about 1/4 of the way through I started to feel very full. I had taken in a lot of liquids that day. It took me about an hour to finish the 3rd juice. When I arrived home I got into the zone working and doing some chores around the house. I felt very focused.  At around 6pm I started drinking the 4th juice. After this juice I was feeling thirsty so I drank a glass of water and watched some TV. Suddenly I didn't feel hungry or thirsty. At 8pm I tried to drink the 5th juice but my stomach still felt full and I couldn't seem to force myself to drink it. I ended my night with 2 juices left in the fridge.

At first I felt bad like I had failed the cleanse but then I settled on the fact that I should listen to my body and my body was telling me it was full.

I got ready for bed feeling rejuvenated and cleansed. Then at 10:30pm my husband came home from work and popped a goat cheese pesto pizza in the oven. As the smells of garlic and cheese wafted into our bedroom I felt many emotions: anger, resentment, and longing. I turned on the fan, closed my eyes, and went to sleep.

My Overall Impression

My experience overall was great. I would definitely recommend this type of cleanse for someone looking to improve their energy levels.The days following the cleanse I still felt good. I had more energy and my breakout started to clear up. Looking back I think I couldn't finish those last two juices for a couple of reasons. I should have chosen a day where my schedule started earlier say, around 7am. I also think if I had been more physically active that day I might have used up more energy and needed those last two juices. Regardless I feel it was a success and I will surely try this again in the future.


If you try a juice cleanse I would love to hear about your experience. Let me know in the comments below,  on my Instagram-liveloveandtiu, or on twitter @imperfectperla.

Have a great day!

C


Tuesday, October 15, 2013

How To Tuesday: Make Your Own Custom Make-up Palette

It's DIY time!

I thought of this last week when I was repurposing empty containers...ok, trash. It didn't really fit in the same theme as those other products but I still thought you might be interested in trying this.

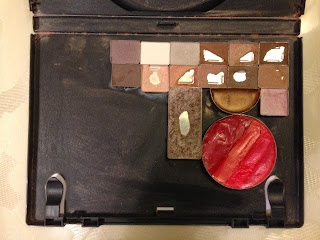
 This is a great way to use an old DVD case to make your own custom make-up palette.

Here's what you need to do:

1. De-pot the eye shadows, blushes, bronzers, or lipstick pans you want in your palette.
   
 2. Arrange the products in the palette so the DVD spool is not hitting any products. If you want to get extra crafty you can take a very sharp knife and actually cut out the DVD spool. Alternatively you could place the products in the circle of the spool.

3. Next, take some super glue and glue in your products. Make sure you are comfortable with the arrangement before hand because the super glue is not easy to remove without ruining your product.

4.  Then take out the inside cover and trace it's shape around the new cover you want on your palette. I chose to use a pretty piece of card stock but you might also consider printing something on your computer with a title for your palette.  

5. Slip the new cover in place and you are done!

 
Here is a picture of one I made. I chose a piece of pink damask card stock as my cover because I LOVE all things damask.


Here is the inside. As you can see mine has been well loved. 
 
 
Also, if you are wondering how to de-pot products here is the way I usually do it. You will need a lighter or a lit candle and a safety pin or needle.
 
1. Hold the flame under the product to loosen the glue holding the product in its pan.
You may need to wear a protective glove or hold the container in a cloth because the container may get very hot.
2. Next very carefully try to slip the safety pin in between the product's container and the pan. Lift up ever so gently to remove the pan.
 
This sounds much easier than it actually is unfortunately. It may take a few attempts before the pan comes out. I would also recommend you try this method on a cheaper product you don't care as much about because it can take some practice to get it right and you don't want to ruin any of your favorite high end products.
 
Have a beautiful day!
 
C


Monday, October 14, 2013

Monday Motivation Through Mindfulness

Maybe I am alone here but Mondays are when I feel the most motivated. It's a weekly chance at a fresh start. Every Monday I like to make a list of attainable goals for the week.  Checking things off this list is very therapeutic for me so I always include some small things like "take mail to post office" or "do load of laundry." Completing those little mundane tasks motivates me to tackle the bigger things on my list. Monday is also the day when I try to get myself pumped for the week. I do this by seeking out inspirational quotes, affirmations, or doing some mindfulness practice. 

The practice of mindfulness is a great way to feel motivated and inspired.  Essentially mindfulness is the practice of being aware of your surroundings in the present moment. When we are mindful we take in each moment and cherish it for what is it. The more we bring our focus to the present moment the more we can clearly set our intentions and enjoy the day. 

Here is a quick mindfulness exercise you can try for better focus. 
1. Stop what you are doing and just sit still for a moment. 
2. Take a few deep breathes and each time you inhale imagine the air starting from the tips of your toes and moving up your spinal cord all the way to the top of your head. As you exhale imagine the air coming into your body and flowing down your back, reaching every organ. You can also imagine when you are exhaling you are pushing out all negative thoughts and when you inhale you are pulling in positive thoughts and intentions. 
3. Now, open your eyes if they were closed and look at the objects immediately surrounding you. Really take notice of your surroundings. Give each object a few moments of your attention. 
4. Then pull your focus back on yourself. Really notice yourself and pay attention to your physical and mental being. 
5. Traditional mindfulness practice might leave it here but I like to use this focus I've created to set my intentions. I also give myself some positive affirmations and smile. The simple act of smiling can greatly improve your mood. 


Here are some mindfulness quotes that really inspire me.

“Do every act of your life as though it were the very last act of your life.” 
― Marcus Aurelius 

"In this moment, there is plenty of time. In this moment, you are precisely as you should be. In this moment, there is infinite possibility. ” 
― Victoria Moran

“Walk as if you are kissing the Earth with your feet.” 
―Thích Nhat Hanh


“You actions are your only true belongings.” 
―Allan Lokos 

“We use mindfulness to observe the way we cling to pleasant experiences & push away unpleasant ones.” 
―Sharon Salzberg 


Have a great day and don't forget to smile, 

C

Saturday, October 12, 2013

Sick Day Essentials

Happy Saturday!

Lucky me I woke up yesterday morning with a sudden and awful stomach flu. I will spare you the gory details but I spent the whole day either under the covers or in the bath trying to alleviate my stomach and head pains.  When I get a bug like this I can't take any medicine because I can't keep any medicine down. So, I have to resort to other methods of relief. Cold and flu season is upon us so I thought I would share my sick day essentials in case these might help you someday this season.


A Hot Bath
Nothing helps alleviate aches, pains, and nausea more like a hot bath. When I would get sick as a child my mom would plop me in a hot bath. Sometimes she would use a cup or her hands to pour the bath water over my back. Now, as an adult I use this method for almost any type of ailment I might have. I pour my own bath water now, though. Yesterday I added some rosemary and peppermint foaming bath oil for an extra soothing effect. I used this one by Village Naturals but I know there are lots of options out there.

OregaSpray
This goes along the same lines as the aromatherapy bath oil but this stuff is seriously amazing.This spray has a mix of lavender, clove, and oregano oils. Oregano is a natural bacterial and virus killer so it can help speed up recovery from any cold or virus. I like to spray it into a tissue, place the tissue over my nose, and then take 2 deep breathes. If you have a stuffy nose this will open up your nasal passage really well. The lavender scent is relaxing and can help you sleep. Some nights I spray this on my pillow before bedtime. The only downside is the spray contains pure essential oils so the scent can hang around on your skins and hair for awhile making you smell strongly of oregano. My husband often jokingly says I smell like a bowl of spaghetti. I don't really mind the scent though and the benefits far override me smelling like a spice rack. I got mine at a local health store but I know The Vitamin Shoppe sells it and you can find it online too.

Gel Face Mask
Whoever invented cooling face masks is a pure genius. I constantly have one of these in my fridge just in case. I suffer from frequent headaches so having one of these on hand is essential.  It is also great for breaking a fever if you are vomiting and can't pain reliever. Sometimes I strap the mask to my forehead or top of my head depending on where my headache is located. I have tried many different brands of masks in my day and honestly the best one yet came from Dollar Tree. If you don't have a Dollar Tree near you I would suggest finding a mask that has little beads inside rather than the solid gel. The beads seem to mold to your face better in my opinion.

Yogurt Bites
When my stomach feels well enough to eat something I like to start with crackers or these yogurt bites. This snack is actually branded for toddlers but aren't we all kids at heart?  The yogurt bites melt in your mouth and are gentle on your stomach. They also taste great and I eat them as a snack even when I'm not ill.

Ice Water
This is kind of a no-brainer but people often end up in the hospital from the flu due to dehydration. Two years ago I went to the doctor for a severe flu and my doctor gave me two options: get an IV of fluids or rehydrate myself by drinking 2 liters of water over the course of the day. I hate needles so I chose the latter. The trick my doctor gave me was to make the water as cold as possible and then take at least one sip every 4-5 minutes. Dehydration can cause headaches to worsen so hydration is the most important part for me when I'm sick.

Hot Tea
Once I can keep down water I make a cup of hot tea. I like to use a black tea. Specifically I prefer Constant Comment tea by Bigelow for nostalgic reasons. Mint and ginger teas are also great for settling your stomach. Just make sure you choose a tea without artificial flavors. Those artificial additives can cause further upset to your stomach.

Besides the essentials listed above a comfy pair of pjs and a good movie are always a must for me. I'm also planning to get a flu shot in a few weeks. My workplace offers them for free but most drugstores or health clinics offer them for a reasonable price. I know there is a lot of controversy around whether or not to vaccinate for the flu but I get sick very easily so I think I'm going to opt-in. What are your thoughts about the flu shot? Do you have any essential items you use when you're sick? Let me know in the comments section.

Thanks so much for stopping by and I hope you have a great weekend!

Be well,

C


Thursday, October 10, 2013

Ideas For Repurposing Household Items

Lately I have found myself recycling and re-purposing things more. Partly because I have begun to see alternative uses for my everyday products and partly because my town's only recycling center is kind of out of my way so I am constantly staring at a pile of empty containers in my kitchen.

 Here are some of my favorite ways to reuse household items.

1. If your protein powder doesn't come with a scoop you can use the scoop from Oxyclean or similar products when you're finished with them. Any product with a scoop close to the protein powder's serving size will work. Just remember to clean and sanitize the scoop well so you don't get a soapy protein smoothie.

2. Reuse food jars. Instead of tossing spaghetti, pickle, salsa, or olive jars you can use them to store your lunch, leftovers, and much more! They may look less trendy than mason jars but they will get the job done just the same.  Use hot water to remove the paper label and a little oil to remove the glue. 

My favorite foods to store in empty jars: 
~Soup
~Salad
~Smoothies
~Yogurt
~Mixed Fruit
~Iced Tea
~Granola
My favorite non-food items:
~Hair ties
~Bobby pins and small hair clips
~Cotton pads or cotton balls
~Homemade body scrub or face mask. 
~Q-tips
~Spare change. Sometimes I like to label the jar and save my change for something specific like new shoes.  
~Beads and craft supplies
~Mini-beauty samples

3. Do you have piles of magazines laying around because you want to save that one recipe? Tear out the recipes you want to save, grab a 3-hole punch, a 3-ring binder, and create your own recipe book! Then you can recycle the leftover magazines and save space while saving the planet. If you want to put in a little extra work and money you can get presentation covers at an office supply store an slip the recipes in there for extra protection. 

4. Clean out a non-aerosol hair spray bottle to use as a salad dressing spritzer. Just add olive oil and balsamic vinegar to the bottle, shake well before each use, and spritz on your salads or veggies. This way you don't have to worry about over pouring.

5. Use 2 empty wine bottles as candle holders for the dinner table. You might need to shave down the ends of the candles slightly if your bottle opening is too small.  If you're going for a more casual dinner you could skip the candles and just put a few flowers in one wine bottle. 

6.  Use twist ties from bread and other goodies to keep computer and TV cords from getting tangled. 

7. Any product that comes in a resealable bag can be reused to transport your lunch or snack to work or school. Rinse it out first, of course. 

Those are all the things I have be reusing lately. How about you? Do you have any other uses for commonly trashed or recycled items? Let me know! 


Wednesday, October 9, 2013

Quick And Easy Veggie Soup

Happy Wednesday!

I hope you are all having a wonderful day. Where I live it has been raining all day and on days like this my favorite food to eat is soup.  So I opened my fridge, grabbed every veggie I saw, and decided to try a little experiment. It turned out to be a very delicious experiment so I thought I would share it will you all.

If you follow me on Intsagram (liveloveandtiu)  then you saw this picture I posted:


This recipe could easily be modified to use whatever veggies you like or happen to have in your fridge.


What I used:

1 Large carrot, sliced 
3 Small stalks of celery, sliced
1/2 Turnip, cut into cubes
~1 Cup of kale - The kale I had was already cut but if you have full leaves I would cut them down to bite size pieces. 
A little dash of Turmeric
A dash of Oregano
1/2 Tbsp diced garlic
A sprinkle of cayenne pepper (if you don't want a little kick just skip this)
A a few grinds of fresh black pepper
1-1/2 Cups low sodium chicken broth
3 Cups water
1/2- 1 Cup Marinara sauce (mine was tomato basil) or tomato paste.


A quick note about my broth:

I really did not plan to make soup so I only had about 1 1/2 cups of chicken broth in my fridge. I didn't have any tomato paste so I just added some tomato basil marinara sauce to the water and it worked just fine. Sometimes you have to work with what you got!

I mixed the broth first, then added the veggies, and then the spices. Once it all came to a boil I simmered it on medium for about 10 minutes until the turnips became tender and then let it simmer on medium/low for about 15 minutes. I did a few taste tests and added a little more garlic and pepper to taste. Viola!


I am very pleased with the results! The turnip was an especially nice alternative to potato. If you try this yourself let me know what veggies you used. Or if you have a really good veggie soup recipe leave it in the comments and I'll try it. I always love a good soup. 


~C


Tuesday, October 8, 2013

How To Tuesday: Easy No Foundation, Foundation Routine


Was my title confusing enough for you? No? Shoot.

Today I want to share a super easy, super lazy way to apply "foundation" without actually using foundation at all. While recently on my honeymoon I realized the humid sub-tropic climate of St. Lucia was not going to make wearing an actual foundation very comfortable. The first morning I began my beauty regimen like I always do, covering up the bluish-purple circles that have staked their claim to my under eyes. I have been using the Garnier Skin Renew Anti-Dark Circle Eye Roller for about 2 months and I really like it. I've found is really does help brighten the eye area and diminish dark circles. It's also cooling and does a little de-puffing. I got mine at Ulta but I think they sell them in most drugstores.

Anyway, while enthralled in my under eye concealing world my new husband gently pressed me for exactly how much longer I was going to take to get ready. His Panama Jack vacation style took all of 5 minutes to complete so he was ready to head out and explore the island.

 I too wanted to get out so with my concealing wand in hand I swirled it all over my face in circular motions.  Then I used my Real Techniques Expert Face brush to buff the product into my skin. Viola! The situation was vastly improved within a matter of seconds. It gives a sheer, dewy look which is perfect for a low-key day. Even after swimming in the ocean my faux foundation was still providing some coverage. For extra coverage you can top it off with a mineral or powder of your choice.

Here are some photos. Try it out for yourself! (P.S. I'm wearing eye make-up and a lip tint too)

Before


After


Here is a picture of the actual product.


Monday, October 7, 2013

Pearls of Motivation

Hello my lovelies!

It's Monday and we all know how hard it is to get motivated for the week after a nice, relaxing weekend.

Here are some pearls (thoughts, quotes, and tips) to get you ready for the week ahead. 

~ "Our greatest weakness lies in giving up. The most certain way to succeed is alway to try just one more time." -Thomas Edison. 

~ Set yourself up for success. Make a "To-Do" or "Goal" list first thing Monday morning. The simple act of writing down your tasks and intentions will increase your chance of accomplishing them. 

~ De-clutter and organize your work/study space. The more physically organized your work area is the easier it will be to organize your thoughts and focus on the important things you need to get completed. 

~ "By failing to prepare, you are preparing to fail." -Benjamin Franklin. 

~If you feels yourself getting a case of the Mondays, take a moment to reclaim your day.  Often times other people and situations take away our own control over our emotions. Acknowledge the negative feeling, allow yourself to feel it, and then let it go. Imagine putting it in a bubble and watching it fly away. Take a deep breath and just remember: you got this!

What keeps you motivated for the coming week? Let me know in the comments below.